Specifically the one where it shows how to put the LPR inside the frame and how to drill the holes into the CP direct mount.
Thanks, Connor

 minimag owner
Specifically the one where it shows how to put the LPR inside the frame and how to drill the holes into the CP direct mount.
Thanks, Connor
Registered User
Here's a good one: http://www.pblegion.com/showthread.php?t=818
 Registered User


Here is the pretty much the same one: http://www.bigevilonline.com/showthread.php?t=7
The only difference is cyberave68 no longer posts on pbl. So if you wanted to ask him any questions you would be better off on beo or here on AO.
I like 'Mags.

Does that video tutorial still exist somewhere?
Arstron had it hosted on his site for awhile... but I haven't seen him post in aeons.

Super Chicken
I have a copy of the video, if someone can host it, I can find a way to get it to you.
I like 'Mags.
Who... me? Or to the OP?Originally Posted by Temo Vryce
Registered User
Are you talking about YOUR video tutorial? I have a copy I could lend to anyone who PMs me. Your video doesn't show how to mount the LPR, though. Maybe you should do another one.
I like 'Mags.
Perhaps someone should send me some work and I just might
Heck, I'd love to do a G-Force LPR install video.
minimag owner
none of those links are what I'm looking for, I guess I'll have to go search for them myself......damn!
Registered User
just read your post again. And no there are not any how to's that I am aware of for what you are wanting.
Only a few people are doing that mod and getting paid for it. Good luck.
 www.BigEvilOnline.com


From what I understand, that is some sort of trade secret. Like Smoothice said, people charge for that service so Im not sure they are willing to give it out.
However, talk to Cyberave68, he may help you out.
Registered User

I think you are talking about the sleeper mag correct?
if that is the one that you are looking for, there isn't any tutorial on it. Cyberave can do that mod, but it will cost you, which is simpler than trying to find all the tools yourself.
Pneumagger and the teacher ( spelling?) will also do the mod for a price.
mag79 use to do it, but he is busy with family stuff right now so he can't do it. Even though he did post part of it on bigevil.
www.BigEvilOnline.com
You are correct. Forgot about that one.
http://www.bigevilonline.com/showthread.php?t=740
Super Chicken
I'm just saying that I have the Video. If some knows of a sight I could host it on for free I'll upload it and get it hosted.
I like 'Mags.
It's a simple mod depending on the tools you use and the ASA you choose.
Supply the LPR ASA and frame and I can do it less than an hour for you
After finally getting all moved into my new house and getting the shop setup, I'd love to do a handful of installs for the gforce frames and other frames too.
I just bought a new Lathe and rebuilt my Mill and am in the process of tooling up the lathe
Firstly, you NEED a small LPR and WGP regs work great because they have a beefy threaded nut the LPR body uses.
The Palmer Microrocks are actually too big for most frames other than vert frames.
Then yuo need a direct mount ASA. A railed ASA can work... but easier to just use a direct mount. CP makes great ASA's for this.
Direct/Rail mount on/offs CAN be dont but drilling requires a bit more finesse and measurement. See here: http://i53.photobucket.com/albums/g4...s/100_2575.jpg
There are 3 ways to do this mount... well, I have done it for people 3 different ways but there may be more methods.
From easiest to hardest (and likewise least to most slick)
1) Sealed banjo Bolt
2) Retaining banjo Bolt
3) LPR/Frame/ASA direct mount.
#1 requires some Drills, a Drill Press, Red Locktite, and Epoxy. This has worked ok for rail mounted ASA's
#3 Really requires a Mill and either a dremmel or lathe. By far the most "factory" type of install. Only for direct mount Adapters.
#2 is actually a "quick fix" for frames that have too large of a bottom hole mitigating option #3
This won't be a tutorial or how to so much as just an informational post.
It won't even be very refined or easy to follow unless you already handy in a shop (google is your friend here for sizes and terminology).
I'm an engineer, not a writer... sucks for you, I guess. That's why I made the pneumag video tutorial last time.
This should be enough to get the average tinkerer started and finished.
My Disclaimer: Certain aspects of these installation methods are likely to get you killed, exploded, maimed, blinded, or laid. Proceed with caution and common sense. Your misfortune or unfortunate mental aptitude are not my responsibility (ulness your mother and I have had relations) and you assume all responsibility for your actions by having made the conscious decision to follow direction from somebody like myself. This advice is to be taken as reference only and the information is only valued at what you paid for it. If the SHTF, all I can recite is Ben Kenobi's iconic ultimatum, "Who's more foolish? The fool or the fool who followed?"
-------------------------------------------------------------------
Install #1
This install is more or less permanent and I only reccomend this install if you want to use some sort of rail.
You need a WGP small LPR, Direct mount ASA or Rail mounted ASA/on-off, frame with suitable internal space, and a 1/4"-20TPI bolt... or preferably a long set screw.
Tooling involves at minimum a solid drill press, a few drills and taps. I guess if your name is Jesus Christ, you can get by with a dremmel or hand drill.
With a 1/4-20 tap, thread the nickle plated brass LPR fitting all the way through. You needn't drill a clearance hole as the supplied input hole should be good to go.
Be careful because even though brass is "soft" and taps easily, it is a very "grabby" metal so be sure to back the tap off often and clear chips often - nonferrous cutting oil always helps. (Brass claims many taps each year and we must do our part to curb this growing epidemic clouding the prospect of our childrens' future.)
We need to make a banjo bolt now so take the 1/4"-20 bolt or set screw and drill a through hole down the centerline of the bolt.
It would be preferable to use a mild steel bolt but brass allthread will be OK - using a hardened bolt is asking for trouble.
You'll want to use a 1/16" machine-screw length or jobber length drill bit with minimal shank exposed and DEFINITELY use center drill to start the hole.
Cobalt/Carbide will be your best bet for a good hole straight clean hole... be VERY mindful of your alignment if not using a lathe or well trammed mill.
Next, Drill a 1/4"-20 free fit (loose fit) clearance hole in the frame RIGHT BETWEEN the ASA screw holes. Better yet... Drill a free fit clearnce hole for a 1/8"npt thread into the frame. If you are using a railed ASA, drill the 1/4-20 clearance hole in the rail, as needed.
Next, drill a 1/4-20 pilot holt exactly between the screw holes in a direct mount ASA. If using a rail mounted ASA/on-off determine hole position so that all your holes line up as desired.
Tap the hole you just made in the ASA.
Next, trim your banjo bolt to a suitable length for assembly.
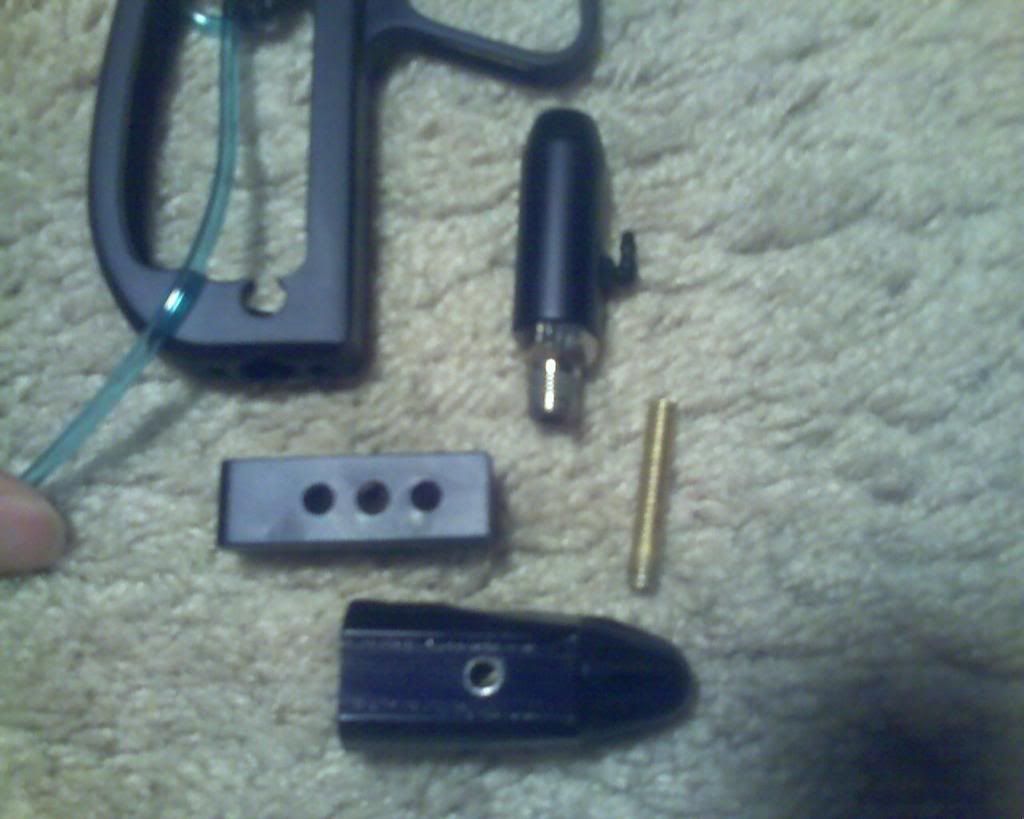
At his point you should have something that looks like this:

Prior to assembly, clean everything well - get all up in there with a qtip. You may see the need to dremmel/mill some material off of the interior of your frame to fit the LPR efficiently as seen in the pic above.
I like to use hot Soap+Water and then rinse with lab grade Toluene or MEK (methyl ethyl ketone) to really clean everything well [insert explosion/fire hazard here]. However, I've been known to take things too far... it's your frame though.
If it's a rail mount ASA be sure the rail is screwed onto the frame with LOCKTITE and the ASA is securely on the rail where you want it before proceeding. If you have a direct ASA just proceed.
I like use a Qtip and apply a light coat of JBweld to the interior of the ASA threads to "wet" the surfaces (I said light).
I then add a liberal amount JBweld to the exterior of the banjo bolt. Keep jbweld OFF the air passage of your bolt.
Install the bolt into the ASA threads and work the bolt back and forth as you thread it in.
Your goal is to use the JBweld like a thread sealant and make an airtight gap to hold nearly 1000 PSI. Intense... I know. Hope you ate your Wheaties this morning.
Technical Explanation: We are using JBweld because, unlike a 1/8npt thread, a 1/4"-20 thread has no taper to cause an interferance seal and we have no orings like an RT Valve's banjo bolt.
Simple locktight (red or blue) would be too weak to provide the entire sealing force. JBweld provides both a structural pressure seal and stops unthreading.
Let it set up and get firm, making sure the air passage tube is not obstructed with JBweld. If so, clean the epoxy off before it dires or redrill it out after it fully cures.
If you have a bolt on ASA, bolt it on now, use locktite to secure the screws.
Next, lightly wet the LPR nut's internal threads and liberally apply jbweld to the other end of the banjo bolt.
Once again, screw the nut on in the same fashion so as to get a good seal with the jbweld, but take care not to get jbweld all up in the air passages. Dont screw in too far or you interfere with LPR operation.
Let it dry the reccomended amount before reassembling the LPR in the frame. Air it up and see if it works.
Hopefully you planned/worked carefully and practice assembly before using epoxy...
because if it leaks you will need to cut off the ASA and rail as well as LPR nut to try a new install. Oh yeah... you need to buy new compnents as well, moneybags.
-------------------------------------------------------------------
Install #2
Lets say you have a direct mount ASA (some on-offs may be compatible) and you DO NOT want a permanent install like above. You want to be able to remove the ASA if needed or fix a leak. Well, because you don't have a railed ASA you have the luxury of option #2. Some of you may also prefer option 3 but have a frame with a hole too big for that - this option is for you too. This is basically the same as Option #1, except the banjo bolt simply pinches an oring between the LPR NPT thread bottom and the top of the ASA - the oring seals and the banjo holds it together. The two surfaces of the ASA/nut are basically in contact and separated by a compressed oring and the banjo bolt is secured with simple (non permanent) locktight.
You need a WGP small LPR, Direct mount ASA, frame with suitable internal space, 1/4ID & 1/16thick urethane oring, and a 1/4"-20TPI bolt... or preferably a long set screw.
Tooling involves at minimum a solid drill press, but very easily could require a small mill depending on your particular setup. Also you'll need a few drills and taps.
With a 1/4-20 tap, thread the nickle plated brass LPR fitting all the way through. You needn't drill a clearance hole as the supplied input hole should be good to go.
Be careful because even though brass is "soft" and taps easily, it is a very "grabby" metal so be sure to back the tap off often and clear chips often - nonferrous cutting oil always helps.
We need to make a banjo bolt now so take the 1/4"-20 bolt or set screw and drill a through hole down the centerline of the bolt.
It would be preferable to use a mild steel bolt but brass allthread will be OK - using a hardened bolt is asking for trouble.
You'll want to use a 1/16" machine-screw length or jobber length drill bit with minimal shank exposed and DEFINITELY use center drill to start the hole.
Cobalt/Carbide will be your best bet for a good hole straight clean hole... be VERY mindful of your alignment if not using a lathe or well trammed mill.
Face off the bottom of your frame and ASA top removing only enough material so the bottomg of the frame and top of the ASA are completely flat and parallel.
Next, widen the hole in the bottom of your frame to allow for a free fit (loose fit) clearance hole of the nut's 1/8npt threads RIGHT BETWEEN the ASA screw holes.
Next, drill a 1/4-20 pilot holt exactly between the screw holes in the direct mount ASA. Now tap the hole you just made in the ASA.
Next, trim your banjo bolt to a suitable length for assembly.
I like to use hot Soap+Water and then rinse with lab grade Toluene or MEK (methyl ethyl ketone) to really clean everything well [insert explosion/fire hazard here].
Screw the bolt into the ASA using locktite to secure it. Put the oring onto the screw and mate it to the surface of the ASA. Screw the LPR to the frame.
Next, face off the bottom of the 1/8NPT threads so they are flat and deburred. Screw the nut onto the bolt and try to find where it begins to compress the oring.
You may have to remove material from the frame and thin out the bottom of the frame so the nut's 1/8npt threads can reach the oring.
Now that you know how far you have to go to engage the oring, add locktite to the nut and bolt and screw on the nut again. Torque that SOB down good to make a good seal.
Let the locktite dry the reccomended amount before reassembling the LPR in the frame. Air it up and see if it works.
If you have a leak you either did not torque down hard enough, your clearance hole was too big (ouch, that sucks hard), or you need a softer oring.
I don't have a camera, so unfortunately many of my installs do not have pictures.
-------------------------------------------------------------------
Install #3 (my favorite)
In this install, you need a direct mount ASA or Direct mount on-off. An oring/seal gland is milled into the ASA and the air is passed directly from the ASA to the frame. The LPR is threaded into the frame and secured in place with epoxy - or if you have an NPT tap long enough (hey that's a long tool ya got there fella
You need a WGP small LPR, Direct mount ASA or on-off, frame with suitable internal space, and a 1/4ID & 1/16thick urethane oring.
You really need a small mill if you want to do this one well with minimal risk and a few drills and taps.
Lets start with the frame. You'll need to thin out the bottom of the frame so the length of the npt threads can reach flush with the bottom of the frame.
Be sure to face off the bottom of your frame and ASA top removing only enough material so the bottom of the frame and top of the ASA are completely flat and parallel and fit well.
Once the frame is thinned out, if the hole between the ASA screw holes is not the correct pilot hole, make it the right size for a 1/8"-27tpi pipe tap (aka: 1/8npt).
Now, if you have a pipe tap long enough or a special jig to do it just tap the hole from the insied of the frame until the nut's threads fits flush with the bottom of the faced off frame.
If you are a mere mortal and only have a standard 1/8npt then tap the hole from the bottom of the frame and chase it out until the nut can thread into it from INSIDE the frame.
There should be NO TAPER to the hole. You will have to do the jbweld seal technique as desribed above and insrt the nut (sealing it) so that the nut's threads sit flush with the hole or are slightly recessed.
Next, using an endmill of the correct size make an oring gland (pocket) into the top of the ASA. If you make it too deep you will not compress the oring properly!!!
Now drill a small 1/16" hole that connects an airsource of the ASA to the center of the oring gland. Finding an internal passage could be tricky depending on your ASA choice.
Now lube/grease the oring, assemble, and air up!!!
A leak could mean you need a better epoxy seal on the frame/nut (if you tapped from the outside), it could mean you did not face off the surfaces well enough, or it could mean you're not getting enough oring compression.
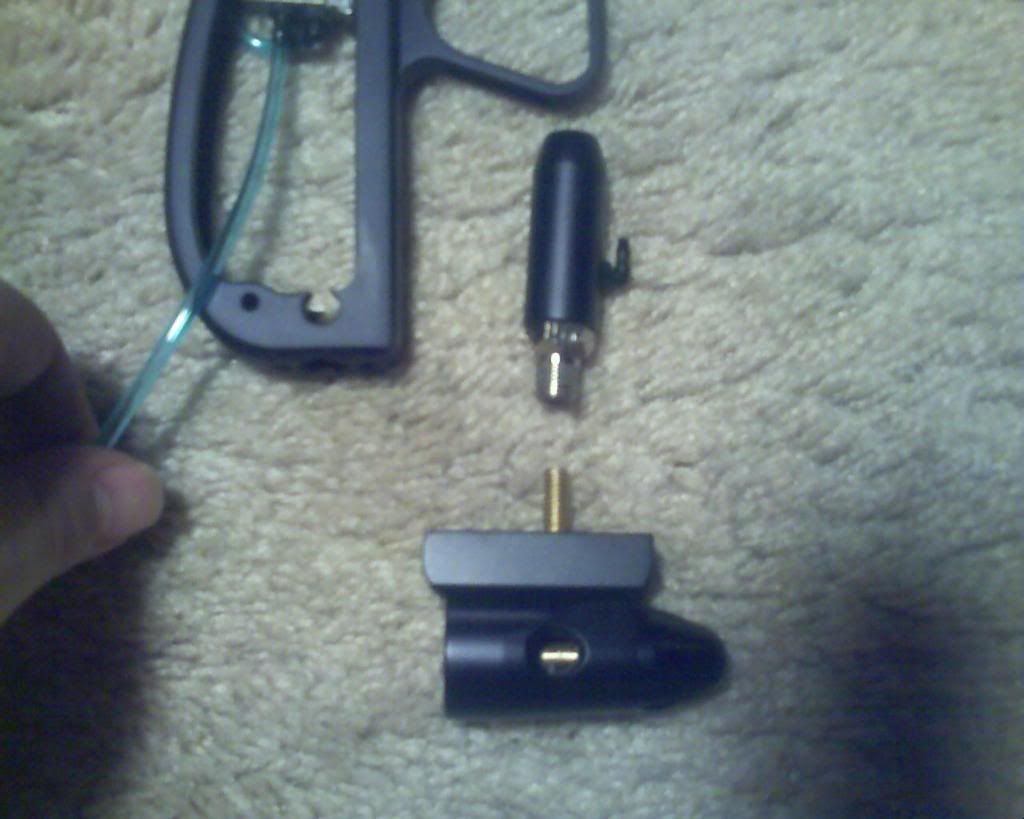
Here are some pics of this install:

-------------------------------------------------------------------
Obviously there's many different subtle differences or tequiniques one could use but these are the basic principals.
Feel free to add your own spice to the recipe.
Last edited by Pneumagger; 08-21-2008 at 07:42 PM.
minimag owner
I know there is one of these threads out there, with pics and I know how its done. I just need the pics to show either warped or luke how its done so they can do it for me. Also this is for a DM5 frame if that changes anything a bit.
minimag owner
OOOH! That's the one I was looking for. Where's the other half?
www.BigEvilOnline.com
Ne never finished it. IM sure Practice Target or Cyberave68 could fill you in on the rest.
Mechanical Engineer & Nerd
I don't know if anyone has tried it yet, but you could make a bushing that is tapped for 1/8" NPT female with 5/8-18 external threads that would allow not permanent installation of the LPR without using a super long tap and still taking advantage of the NPT threads ability to seal. Leave the bushing slightly longer than the thickness of the base of the frame so you can adjust o-ring compression by turning the bushing in more. Or tape/loc-tite the bushing into the frame and use a milled in o-ring gland like Pneumagger's method 3.
Registered User
you can also use the tippman ASA that have build in lpr. It is not as clean as a full sleeper, but will work if that is what you want.
I like 'Mags.
If you tap from the bottom of the frame (removing the NPT taper) the only thing that gets sealed permanent is te LPR thread nut. The LPR is entirely rebuildable and removable... as well as the ASA.
It's just the nut that stays in the frame unless you want to drill it out.
I could tell you but then.

This one??? http://home.comcast.net/~beemerone/PneumaggerHowTo.wmv
Registered Gun-Whore
I've made this writeup a while ago. Hope this helps.
www.BigEvilOnline.com
Not a bad write up FiXeL it looks pretty darn nice....
I may have to fix mine now...lol
Zero Gravity Customs
Play hard or go home......
My feedback
https://www.automags.org/forums/showthread.php?t=129891
 Posting Permissions

 Reply With Quote