Wow - that is fantastic!!! That's exactly what I needed! Thanks!! Now I know what the on/off does, and where the top, bottom, and pin are. Still have to figure out what part of that is the reg piston though.Originally Posted by questionful

 Registered Freak
Wow - that is fantastic!!! That's exactly what I needed! Thanks!! Now I know what the on/off does, and where the top, bottom, and pin are. Still have to figure out what part of that is the reg piston though.
<S>WooLooLoo</S>
the green thing on the back
t33kyboy "So if a cat is dropped from 11 inches, it will most likely die."
Registered Freak
Makes sense - I should have figured that out since it's operating as a pistonAnd, the red dots behind it - that's the valve spring pack?
<S>WooLooLoo</S>
correct
Registered Freak
OK - got my Action Village order AND my AGD order in a day apart. Very nice. So last night I disassembled the bolt and valve to clean everything and replace all the o-rings. I ran into a snag with the RT on/off. The halves won't separate. It's totally different from the classic valve on/off, which has a brass top and bottom. This one has a brass bottom, but the top is the same material as the valve (stainless?) ans shaped differently. Anyway per the diagram there's a small o-ring in between the two. I can't get them separated. I found a wrench sized to fit the top (stainless) half perfectly, but couldn't find anything - standard or metric - that would fit the brass bottom half. And it was late, and I really wanted to get this thing done, so I tried using my teeth to hold it.I know most of you know, but n00bs - DON'T DO WHAT I DID!!! Brass is soft enough that your teeth will gouge it. I'm not even kidding.
Guessing I need a new on/off assembly? This stuff is so precision that I'm thinking the gouges could cause enoug hspace for a leak or something and cause it to function improperly... Would I be right?
Pneumag owner
Use an ajustable wrench for the bottom. The marks on the outside shoud be ok because the on off is sealed by an oring.
<S>WooLooLoo</S>
yeah just put the new o-rings on, oil it up. put it back in
could be all you need to do
Registered Freak
I actually did try that, but for whatever reason the tiny adjustable wrench I have wouldn't open or close. It's stuck where it is, even after oiling it and wd-40-ing it... I tried some small pliers I have that don't have grooved teeth on them, but they were no help either. Spose I'll try a bigger adjustable - which means I have to go buy one
<S>WooLooLoo</S>
can you get us a picture of it?
because the rt on-ff should just pull apart. where as the ULTrigger is threaded.
if i remember correctly
Registered Freak
Absolutely - will do tonight hopefulyl, if not then tomorrow. I tried pulling it apart as well as unscrewing it. The sucker wouldn't budge either way.
<S>WooLooLoo</S>
did you try putting some oil into the holes and on the pin. then moving the pin up and down to work the oil into the on/off? that could help it budge
Registered Freak
Good idea - I had put oil in it when it was out (off the pin) but all it did was slip through my fingers. Using the pin could totally work.
Registered Freak
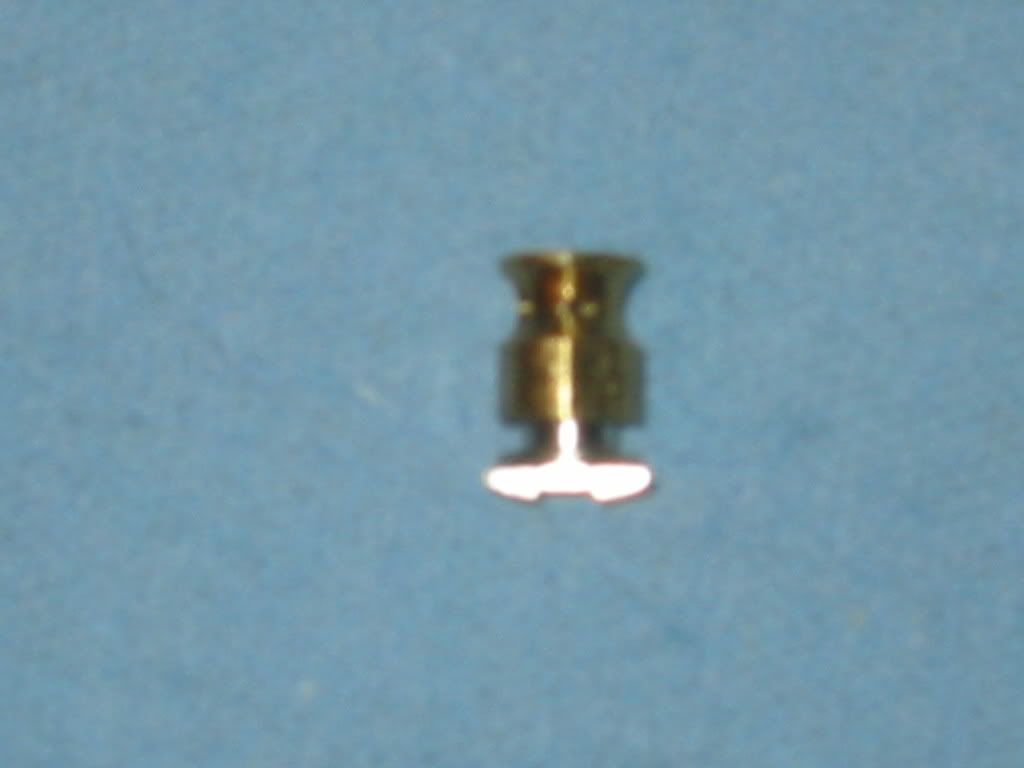
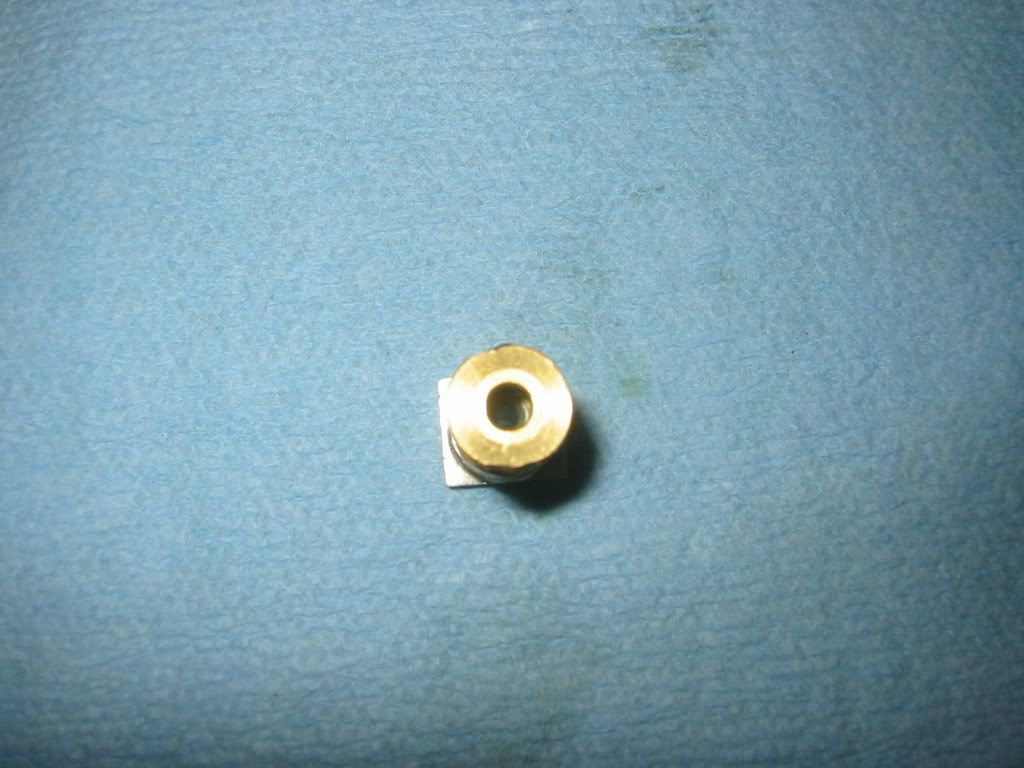
OK got some pics of the on/off:
and
Of course it works-its AGD
That's a retro valve on-off. It should pull apart. Try twisting it as you pull. Use a pair of pliers on each piece for better grip. Don't apply enough pressure to crush the parts though.
Except for the Automag in front, its usually the man behind the equipment that counts.
Registered Freak
Tried that, and they still wouldn't budge (?) I actually damaged the brass part of the on/off enough so that it won't fit all the way back into the valve. Can't necessarily see it in my cheap digi pics, but the edge of the smooth face of it is pushed out to the side a bit - I'm thinking that's why it won't fit. I don't really want to force it into the vavle opening...
Serious About Men

You may need a new on/off from airgun.com, i mean if it won't twist apart (and i think there's an o-ring inside there, it's been years since i've taken my RT apart) then you may just need to buy a new one, which really would suck. The new ones are both brass though, so maybe that'll make them twist better (well both halves of mine are brass at least).
Registered Freak
ok GOOD NEWS! I managed to fix my on/off AND separate it to get a new o-ring in. For the record, the RT on/off is threaded together. There are holes in the sides of the bottom half. I don't know why I didn't think of this before (
Of course it works-its AGD
Yes, it is threaded. I don't know how I forgot that tidbit of information.I should have been more on the ball with that one. I'm glad you pointed it out. The holes are actually in the top part and the square part that accepts the wrench is the bottom part. There is also a flat section on the top part that allows a wrench so that you don't have to risk warping the holes. The halves are named according to how they sit while the valve is in the upright position in the mag body.
I'm glad you got it apart without much damage. I would have felt bad if you had damaged it due to our misinformation.
<S>WooLooLoo</S>
now get some air! then we can help you fine tune the lx
Registered Freak
Thanks! I should have realized that about the top and bottom halves. I was thinking the square part was the top since it was the topmost part while I was working on the valve - which was upside down on the bench area so I could get at the on/off
You're right too about the flat part on the top (brass) half - I just didn't have a working adjustable wrench to use on it. The size is strange - none of my large collection of metric and standard sockets or wrenches would fit. The only thing that'll work in my experience is an adjustable. If I had one that would open, then I wouldn't have tried my teeth, and then I wouldn't have munged up the brass.Just a note to anyone else working on a valve for the first time.
Going to try to get to the shop tonight to get aired up. They're closed Monday-Tuesday which stinks because I had time then... I did salvage enough air out of the bottle to tune my carrier and shims appropriately (so I hope) and make sure I didn't have any otehr leaks in my setup with all of the new o-rings. There's still 600-800 psi in the bottle according to the guage, but I'd rather work with at least 1000 so I know I'm getting gull pressure out of it. I am so close I can taste it
 Posting Permissions

 Reply With Quote