-
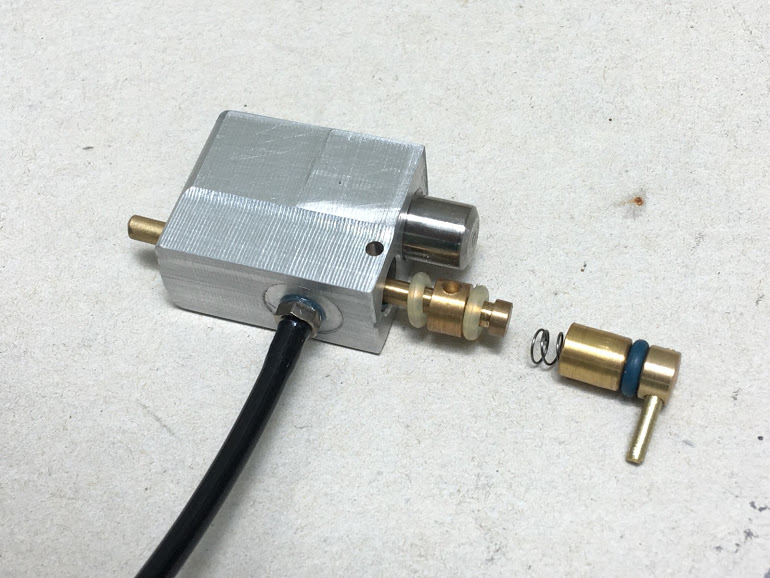
the SPAR valve (pneumatic auto-response trigger)
This…is the SPAR valve. Basically, it’s a Select-fire, Pneumatic, Auto-Response trigger valve for the Automag Intelliframe that cost about $150.


Shooting demonstrations:
1st Prototype
2nd Prototype with safety switch
3rd Prototype with single trigger frame
Production model with EZ ASA sleeper mod
Video Manual
The valve is mounted/hidden inside the frame like a typical pneumag set-up, but this can fire the marker on both the pull and release of the trigger. It also has a rotating selector-switch safety (E-MAG style?) with three positions: safe, single fire, and auto-response. This is a significant improvement over previous mechanical auto-response frames, which always fire twice with each trigger pull (even if you only want to take a single shot). The SPAR valve also has a much lighter trigger weight (about the same as a classic on/off assembly).
The base cost for this mod is $150. That covers the valve, the safety, the milling, some new grip screws (the stock screws are too long), and the return shipping in a small flat-rate box. (I can also ship to Canada and overseas if you cover the extra cost.) You must also provide a frame and an LPR. (The price was originally $100, but it was increased on 6/17/2020.)
This is not a pre-order. I’m building these one-at-a-time on a first-come, first-serve basis. I will only ask you for payment when I’m ready to start working on your frame.
How does this work?
1. Let me know you want to be on the list. (Post here or send me a PM.)
2. Find yourself a frame and an LPR. (See the notes below on which kind to get.)
3. Fill out this order form.
4. Wait for me to contact you.
5. When it’s your turn, mail me your frame and send me your payment. (I accept PayPal, or you can send me a personal check or money order with your parts.) Don’t forget to include the order form inside the box.
6. Wait a few weeks.
7. Once you receive the modified frame, you will have to bolt it onto your Automag and mount/tune the LPR. This will be easy, and I’ll send you a video manual showing you what to do. You might also have to cut your grips to make room for the safety-switch (or I can do this for you if you ask).
More details:
The valve itself is pretty simple. There are only two moving parts (the trigger pin and the piston), and the only o-rings inside are off-the-shelf #006 o-rings (1/4" OD and 1/8" ID) that are easily replaced. The internal assembly is held in place with a single 5/64 pin, so it's easy to take it apart and replace the o-rings when needed (probably once a year or so). It will also work on pretty much any Automag with any valve. X-valve, classic valve....whatever. You will need an RT on/off, however. A classic on/off won't cut it.
The piston is made from polished 5/16 steel rod. The back end has a nubbin that fits a u-sup seal. This is also easily rebuilt.

There are two safety styles: the servo arm and the 3D printed switch. (Big thanks to ArmageddonSportz for designing the 3D switch!) Both are included with your order, and they're held in place with the same ball-and-spring assembly used in standard AGD frames. The aluminum servo arm comes with two 1/8" 4-40 socket screws installed. You can easily remove these screws if you want, but I find that they make the switch wider and easier to move.


Your frame will have to be milled to make room for the SPAR valve. I will also drill a 1/8" hole in the back of the frame near the hole for the field-strip screw. This is for resetting the sear. (It's a common mod for all pneumag frames.)

By the way…I should note here that this modification will permanently alter your trigger. Besides milling the frame, I will also have to grind down the back part of the trigger to fit the safety. So, if you’re thinking of just trying this out and then going back to normal if you don’t like the valve, that won't work. You will have to buy a new trigger.
FAQ:
What frame should you use?
I prefer AGD-spec frames (Intelliframes, x-frames, any other double-trigger frame from AGD, anything from Luke’s Customs, Airwalks, Logic UMFs, etc.). Still, I can make this work on almost any other frame that you want (Dye, Angel, Ion, etc.), though I will have to charge you $25-$50 for the extra time required for testing and milling Unfortunately, I cannot do this modification to carbon fiber frames. They are too narrow.
What valve should you use?
Any valve is fine, but you should have an RT on/off assembly.
What LPR should you use?
I’ve built over a dozen pneumags over the years with a variety of set-ups, and I can tell you will complete confidence that really any LPR will do. The smaller ones (like the old stock models from WGP) tend to look nicer mounted on Automags, but I would just go with whatever you’re comfortable paying for. Personally, I prefer Palmer’s LPRs because they are really easy to service, and you can buy knobs for them to make adjustments easy, but they can be expensive.
How hard is the trigger pull?
It’s hard to compare this to anything else I’ve shot. It’s not as crisp as an Automag RT on/off. It’s not as snappy as a pneumag. It’s certainly heavier than a ULT. But the pull is light enough that my finger doesn’t get tired after shooting 100 shots in a row, and it’s smooth and predictable. It’s versatile too. With practice, you can shoot the Automag once even when you have it set to auto-response. You just have to pull the trigger halfway and then stop.
Can I do VASA milling?
One of the coolest ways to install an LPR on a pneumag is to have it mounted on the front of the VASA. If you want, I can easily do this for you for an extra $10 if you send me your VASA with the rest of your parts.
Sleeper Set-Ups:
If you want me to make you a sleeper (with the LPR hidden inside the frame), I can do that too. You can see a sample of my work here. Sleeper set-ups cost an extra $25-$80, depending on what frame you choose.
If you do want a sleeper set-up, you will need an LPR that’s small enough to fit inside the grip frame. You should also check with me about what ASA you want to use. Personally I prefer CP on/off ASAs since ANS-Gear still sells them new for about $35, but other ASAs will work too. Just check with me first so I know what I'm getting myself into.
Last edited by rawbutter; 07-22-2020 at 09:30 AM.
 Posting Permissions
- You may not post new threads
- You may not post replies
- You may not post attachments
- You may not edit your posts
-
Forum Rules


 Reply With Quote