Page 1 of 3 123 LastLast
Results 1 to 30 of 65

Thread: my first ep mag...intelliframe...lots of pics

  1. #1
    Join Date
    Aug 2007
    Location
    Indiana Pa
    Posts
    1,260

    my first ep mag...intelliframe...lots of pics

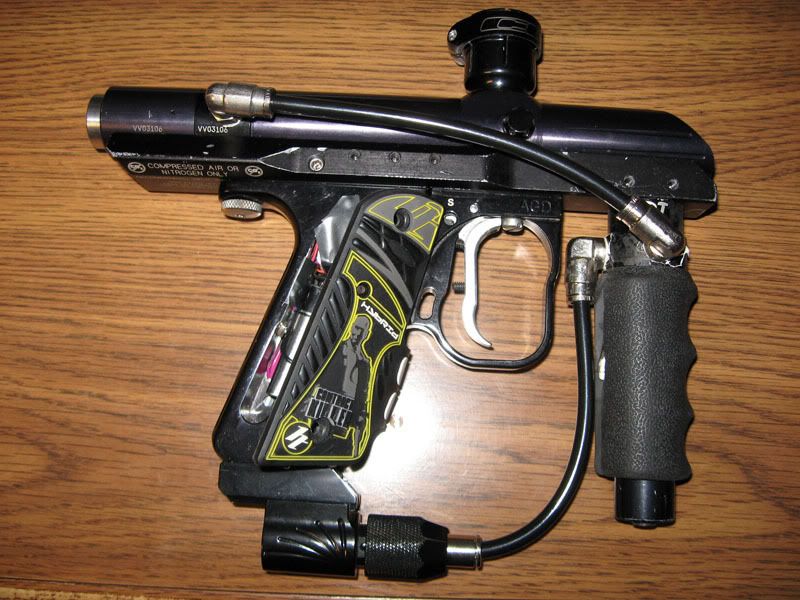
    Let me first say, this is a workhorse, not a beauty pageant winner.....so dont rag on it for being a little beat up.

    This is actually the second incarnation of this EP mag. First attempt was about 4 years ago(right as the ULT came out). It used a basic stamp and a giant noid that needed 12 volt. It worked great then, but it needed an external battery. So I scrapped it....and tried the ULT instead.

    But now it is back.....
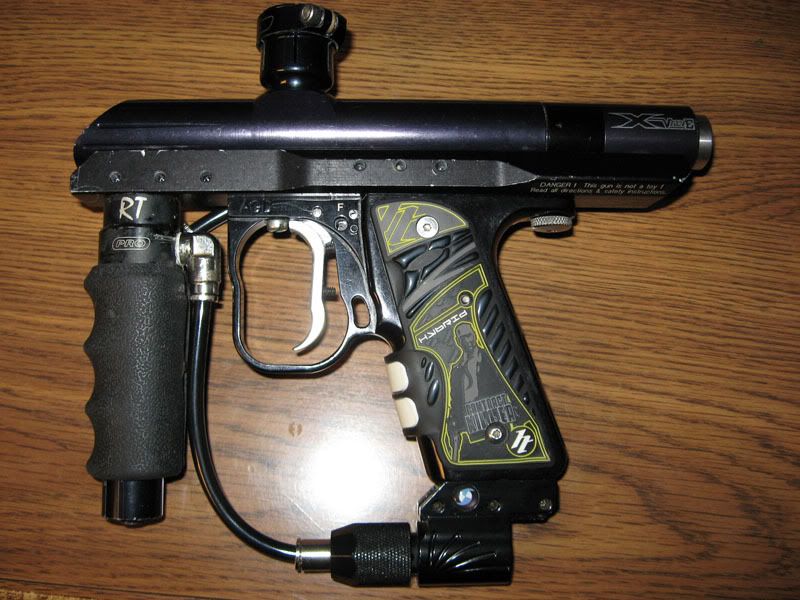

    Other side:


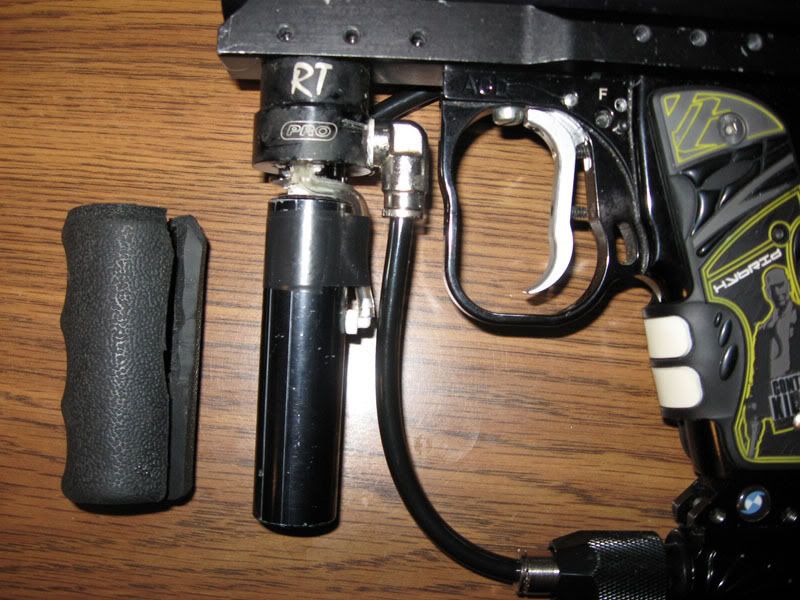
    Reg cover off, electrical tape is there to pinch the line against the reg. LP line goes up through the RT foregrip, and into the rail, then back into the grip....completely hidden:


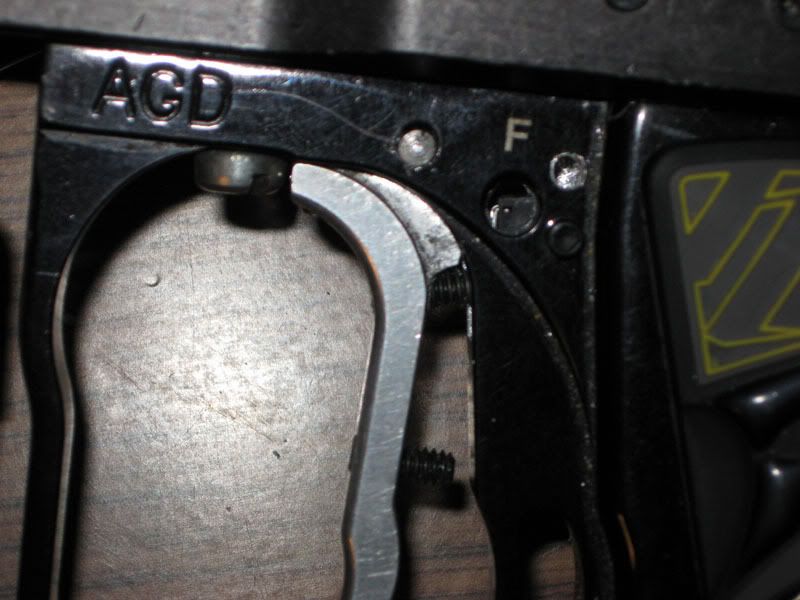
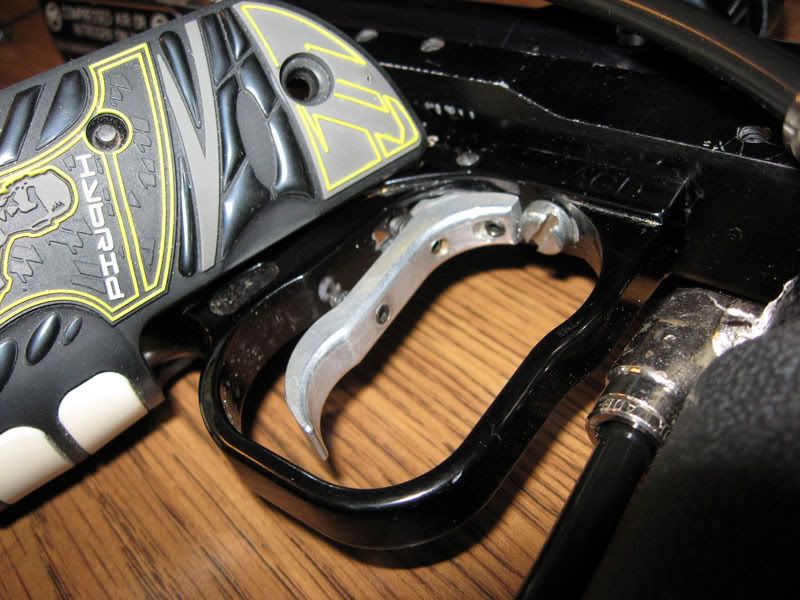
    Up close of the switch.....extra hole is from my initial location, but the trigger was too soft and didnt have enough return force. Where its at now is by far the best feeling trigger ive ever used:


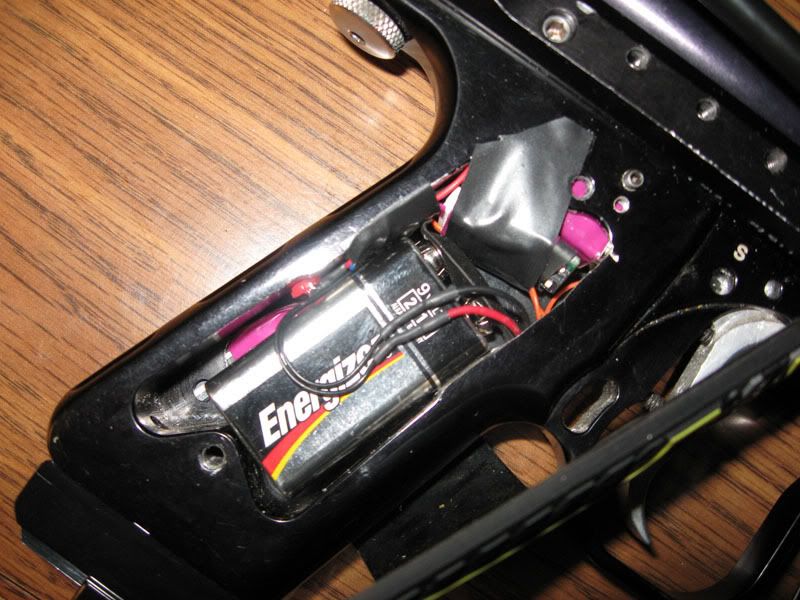
    Now for the money shot.....internals:


    My 3 way adjustable trigger(pre, post, activation point) you can also see the switch a little:

    Yes, I realize thats not an AGD screw....mine is too short for the ULE body and RT rail....happened to have that one handy and I'm too cheap to pay shipping for 1 screw.


    The only real external way to tell its not a normal mag:


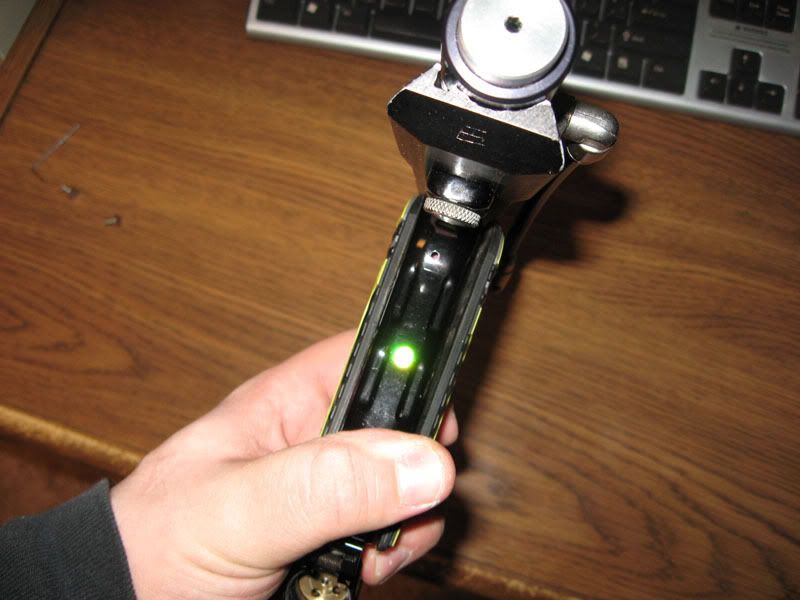
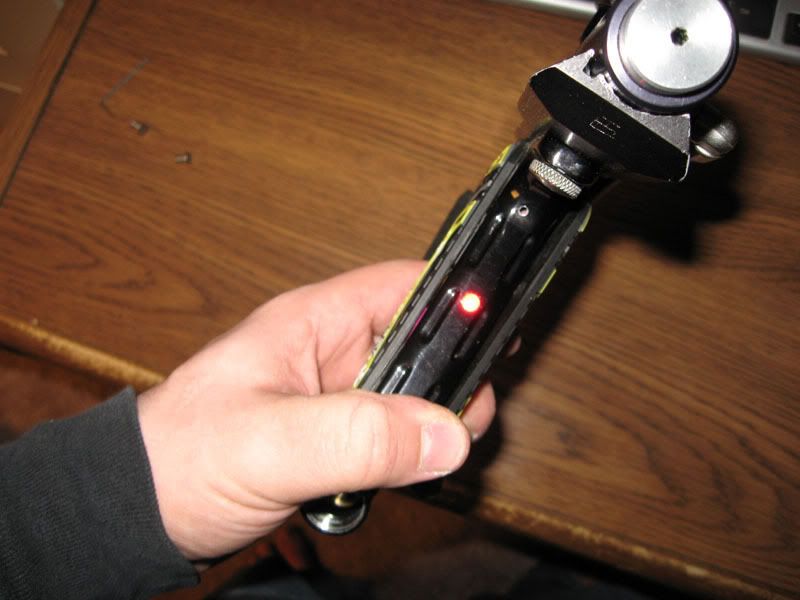
    On/off switch is a membrane pad located under the H at the bottom of the grip, the eye switch is a membrane pad located under the H at the top of the grip. I'm amazed ive never seen anyone else do this because it works GREAT. Nothing has ever accidently turned it on....it takes deliberate pressure right at the corners of the grips to depress the membrane.

    Eyes are coming.....probably making the eye holder/cover tomorrow if theres time.

    Only tools really used were a drill press, dremel, hacksaw, file, and taps. I have access to a mill, but the dremel was much easier for all the test fitting.

    Anyhow, just thought Id show off my little project.....cant wait till the it gets nicer out to use it again. I'll snap some more pics after the eyes are finished.

  2. #2
    Join Date
    Aug 2007
    Location
    Indiana Pa
    Posts
    1,260
    100 views....no replies

    questions? comments?

    heck, make fun of it for having 5 different shades of black for all I care


    If anyones wondering it has a Universal T board and the tiny soleniod from ASP.

  3. #3
    Join Date
    Aug 2007
    Location
    Gainesville, FL
    Posts
    2,600
    I built a i frame'd ep mag setup past nov, they make great sleepers.

  4. #4
    Join Date
    Mar 2007
    Location
    Connecticut
    Posts
    541
    To be honest, it looks like you threw it together after looking through a graveyard of paintball guns. But... thats the cool part! You can totally throw people off when they look at it, because they'll think it's a piece of junk until you rip with it. And no, I wouldn't recommend ano, lol. It think it'll do quite well just how it is. Great work man, a true tinkerer. Who gives a rats azz how it looks, as long as it does what you want it to do!

  5. #5
    I dont thing it looks thrown together at all, just not polished up on anno yet.


    Care to share some pictures wiht the class of how you routed that airline?

  6. #6
    looks very nice I bet it rips.

  7. #7
    Join Date
    Aug 2007
    Location
    Indiana Pa
    Posts
    1,260
    Quote Originally Posted by Zone Drifter
    To be honest, it looks like you threw it together after looking through a graveyard of paintball guns. But... thats the cool part! You can totally throw people off when they look at it, because they'll think it's a piece of junk until you rip with it. And no, I wouldn't recommend ano, lol. It think it'll do quite well just how it is. Great work man, a true tinkerer. Who gives a rats azz how it looks, as long as it does what you want it to do!
    LOL....bet you would never guess that it started off as a standard feed classic about 10 years ago. I'll have to admit, the RT rail and foregrip did come from a friends junk bin, but everything else was purchased from AGD new. I think the rail and foregrip are the parts that make it look bad...other than that I dont think its that horrible. Theres some kind of epoxy on the foregrip, nothing will take it off.

    after thinking how much money is sunk into this thing....just dont make fun of it too much lol


    txaggie08: i'll get some pics good pics of the airline when the eyes come in....hopefully tomorrow.

  8. #8
    Join Date
    Aug 2007
    Location
    Indiana Pa
    Posts
    1,260
    Quote Originally Posted by tebo
    looks very nice I bet it rips.
    thanks! Ive always loved the way the RT pro looks and wanted to keep it as stock looking as possible.

  9. #9
    What noid did you use?

  10. #10
    Join Date
    Oct 2003
    Location
    Beautiful Kailua-Kona
    Posts
    764
    thats looks like a mean sleeper. i like how you mounted the led. im planning on doing the same on my ep frame. when you dont have eyes hooked up does the board default to capped semi or uncapped?
    mag for now, mag forever

  11. #11
    Join Date
    Aug 2007
    Location
    Indiana Pa
    Posts
    1,260
    Quote Originally Posted by halB
    What noid did you use?
    noid
    universal t board


    When you dont have eyes hooked up it is the same as having the eyes blocked all the time. All the modes work just like you have eyes(except of course it cant see if the balls in the chamber) from the manual:
    -Red - NPPL Semi
    -Green - Reactive Trigger
    -Blue - 3 Round Burst
    -White - Full Auto
    -Red - CFOA (capped semi)
    -Purple - Nitro
    -Yellow - PSP Ramping
    -Teal - NXL Auto
    are all the different modes. Dont know if the NPPL is uncapped or not though

  12. #12
    Join Date
    Aug 2007
    Location
    Indiana Pa
    Posts
    1,260
    if your mounting the LED like mine, you might want to do it just a little higher than mine. Sometimes my hand doesnt fully cover it when im shooting.....and that little sucker is bright, espically when its flashing.

  13. #13
    Hilltop,

    That is one great sleeper mag you got there... I know you said don't rag you about it, but for the front frame screw you can go down to your local Home Depot and pick up a Button Cap 10/32 screw in any length... I had to replace the one in my Micromag (had a regular allen head) and my Tac One (stripped allen head) and picked a button head screw there... it costs $ .75 and you get 2 screws (stainless no less)...

    Once again Sweet Mag !!!
    Last edited by WickedKlown2; 03-10-2008 at 09:33 PM.

  14. #14
    Join Date
    Aug 2007
    Location
    Indiana Pa
    Posts
    1,260
    Quote Originally Posted by WickedKlown2
    Hilltop,

    That is one great sleeper mag you got there... I know you said don't rag you about it, but for the front frame screw you can go down to your local Home Depot and pick up a Button Cap 10/32 screw in any length... I had to replace the one in my Micromag (had a phillips head) and my Tac One (stripped allen head) and picked a button head screw there... it costs $ .75 and you get 2 screws (stainless no less)...

    Once again Sweet Mag !!!
    doh.....IDK if I will replace it though. I use the trigger adjustment allen key to remove it not a screw driver. Honestly its just as easy to install/remove as a regular one.

    thanks for the complement and pointing out a local screw source! Maybe if I happen to be in the lowes/home depot hardware section I'll pick one up. Till then....ghetto straight blade screw all the way I think it adds character

  15. #15
    Hilltop,

    No Problem... Just one thing,,, I went to Lowes first and they didn't have what I was looking for and ended up across the street at Home Depot and couldn't believe the hidden treasure chest of button head screws...

    You are right on keeping the Ghetto Screw... Keep it sleeper and beater all the way !!! Light some haters up at your next match and have a blast doing it while laughing the whole time to yourself!!!

  16. #16
    ok, here's a few questions, cause i'm using a intelli frame also, and plan on using the T board and the same noid. Just chopped my intelli up yesterday to make the room, now i gotta get the board and noid, and i'm ready to go.

    a. Is the rof adjustable on the T board to 13.3, even with no eyes? (i'm not using eyes, gonna try to just use the level X, I will be psp ramping most of the time though, so hope the level 10 works ok with that)
    b. did you drill the hole for the trigger switch thru the trigger guard to get the angle like some of the other pneu guides show?
    c. pull that tape off and lets have a looksy !!
    d. the on/off membrane is just pinned inbetween the grip and gripframe ?

    I'm ready to get my project done. I played a tourney saturday and had to shoot my alias WITHOUT MY WARPFEED! My ep mag is gonna be a red ULE left warp body

    OH, AND WHILE I'M AT IT....I was planning on mounting my lpr (ans jackhammer II atm) to the other side of my asa, and running the hose and the warpfeed wire up thru the bottom of the intilli frame . Does anyone see a problem where that would be a bad idea, or just wont work?

  17. #17
    Join Date
    Aug 2007
    Location
    Indiana Pa
    Posts
    1,260
    Quote Originally Posted by Hgblues
    ok, here's a few questions, cause i'm using a intelli frame also, and plan on using the T board and the same noid. Just chopped my intelli up yesterday to make the room, now i gotta get the board and noid, and i'm ready to go.

    a. Is the rof adjustable on the T board to 13.3, even with no eyes? (i'm not using eyes, gonna try to just use the level X, I will be psp ramping most of the time though, so hope the level 10 works ok with that)
    b. did you drill the hole for the trigger switch thru the trigger guard to get the angle like some of the other pneu guides show?
    c. pull that tape off and lets have a looksy !!
    d. the on/off membrane is just pinned inbetween the grip and gripframe ?

    I'm ready to get my project done. I played a tourney saturday and had to shoot my alias WITHOUT MY WARPFEED! My ep mag is gonna be a red ULE left warp body

    OH, AND WHILE I'M AT IT....I was planning on mounting my lpr (ans jackhammer II atm) to the other side of my asa, and running the hose and the warpfeed wire up thru the bottom of the intilli frame . Does anyone see a problem where that would be a bad idea, or just wont work?
    a. utb manual I believe with no eyes it should be the same as with eyes(just the board will act like a ball is always in the breach)
    b. my switch is located right behind the trigger. If you look at the close up shot of the saftey you can see it there. You will have to widen this area to fit the switch, and also cut the back "nub" off your trigger. This is simply the ONLY place to mount the switch in the intelli that ive found.
    c. in a minute i'll pull the internals out and show it all
    d. yep, just stuck to the grip frame right under the corner of the grip. It wont work for a normal one though, I cut 2 of them up(i had a few) so one is a power switch and one is the eye switch, and they can be located away from each other

    I wont lie it is tight in there....I even had to grind down the actuating arm of my sear so the noid could fit nice and tight to the ram(not much...probably 3/16, but its no good for going back to mechnical, i bought one specifically for this just in case I feel like going back).

    You shouldnt have any problem with your LP hose/wire route, just dont pinch them.

    WickedKlown2....doh again, no Home Depots close to me....looks like i'm stuck with the sexy ghetto screw

  18. #18
    Join Date
    Aug 2007
    Location
    Indiana Pa
    Posts
    1,260
    Well heres some more pics hopefully you guys can get a better idea of whats going on:
    Airline route:


    In the last picture you can make out the switch placement too. The electrical tape on the sides of the ram actually holds the noid tight against it underneth....its not there to hold the ram in any way.

    Membrane simple, yet so effective:


    Internals; It is basically a noid sandwich with the ram and the board being the bread:


    If your using an intelliframe you must get the ram flush with the top of the frame.....if you dont, your probably going to run out of space.

    LMK if you want any more pics....I'll keep it apart till I get they eyes installed.

  19. #19
    you shaved the back of the trigger off to make room, could the back of the trigger actually be used to engage the switch instead of the middle adjustment bolt? Or ya think the tolerance would be too close to get it just right? or possiblly not be enough room to place the ram correctly? Great thread btw, just what I was lookin for to clear up ideas I had before I finished mine up.

  20. #20
    Join Date
    Aug 2007
    Location
    Indiana Pa
    Posts
    1,260
    Quote Originally Posted by Hgblues
    you shaved the back of the trigger off to make room, could the back of the trigger actually be used to engage the switch instead of the middle adjustment bolt? Or ya think the tolerance would be too close to get it just right? or possiblly not be enough room to place the ram correctly? Great thread btw, just what I was lookin for to clear up ideas I had before I finished mine up.
    ehhhh, the first time I did it I used the back of the trigger like you said. If you choose to do that way you have to bend the switch lever to get it to activate at the right point.....to bend the lever you have to take the switch in and out a bunch of times to get it right.

    Either way your going to have to cut it down some....because if you dont the back of the switch will be where the ram needs to go.

    Overall I found it much easier to chop the back of the trigger off and add another setscrew. Plus you have the added benifit of being able to easily adjust it whever and whenever you want without taking anything apart.

  21. #21
    ahh, gotcha, the full adjustability of the trigger angle would be nice...

    I was thinking of using the lighter switch, but seeing as I'll be using ramp mostly , i donno if the lever switch maybe enough.

  22. #22
    Join Date
    Aug 2007
    Location
    Indiana Pa
    Posts
    1,260
    Just make sure the switches are the same size and shape....you should be able to switch one out for the other if you want to.


    I just used the stock switch I recieved with the T board....i think its 50g(not sure though). If you go with a lighter switch you might have to use a magnet return.


    dont forget the closer to the pivot point you put the switch....the lighter it will feel. (within reason...ie dont put it on the pivot and expect it to work that well)

  23. #23
    One more question: What ram did you use?

    Very very nice project. Let me ask you, have you shot a mag that had a normal electric frame? One of those sear tripper frames like the hyperframes? How does your mags EP compare to the tripper?


    Oops, need another question: How much does the total rig weigh?

  24. #24
    Join Date
    Aug 2007
    Location
    Indiana Pa
    Posts
    1,260
    i used the standard ram for pneumags....the mpa3. just used a cut down bolt for the actuating pin

    I havent shot the sear tripper frames....but my trigger is about the same as my ion with a t-board in it. It is MUCH lighter than my stock bushmaster.


    Weight.....my LPR didnt add any weight because I cut off the foregrip for it. So only added weight would be the 9 volt and electronics, but I took a lot of material out of the frame....so its probably the same weight as a RT pro.

    Once the eyes are installed; if i remember, I'll get a final weight.

  25. #25
    Join Date
    Aug 2007
    Location
    Indiana Pa
    Posts
    1,260
    I forgot to include a few pics last night:

    This is how the noid sandwich fits in the gun:


    (the kink in the line wasnt there be4, I think once its pressurized it wont matter, but I'll be fixing it anyhow)

    And a pic just to show how short the airline is between the noid and ram


  26. #26
    well, It has finally begun. I finished up my dremel work on the frame today (sheesh, hope i'm finished anyway), got my trigger switch wedged in nice and snug where it's gonna sit. Man, when you said it was a tight fit to get all this in a intelli frame, you were'nt kiddin!! So, here's what i'm guessin gonna be my next steps. Gonna put a set screw in to hold the trigger switch in place (did you only use 1 set screw for the trigger switch?), gotta put 2 stop screws in the trigger, get my noid, board, and ram all snugged together and hooked up( gotta ton of access wire it looks like), and probly drill out the hole in the bottom of my grip a bit to make room for my lpr hose and my warp feed wire.

    Now, you mentioned you had to cut some of your sear off? How much did you cut off? I can see why you would have to, as tight as the switch and ram are wedged in.

    Gonna be a red ULE, level X , warp left, X valved, intelli grip , setup. I cant wait to show the pics!

  27. #27
    Join Date
    Apr 2004
    Location
    Atlanta
    Posts
    857
    Nice sleeper job! man that noid is TINY! find a better (your is good, dont get me wrong)way to hide that goofy vert LP hose and this thing will be PERFECT! GREAT JOB!!!
    Last edited by insixdays777; 04-12-2008 at 10:11 PM. Reason: spelling

  28. #28
    Join Date
    Aug 2007
    Location
    Indiana Pa
    Posts
    1,260
    Quote Originally Posted by Hgblues
    well, It has finally begun. I finished up my dremel work on the frame today (sheesh, hope i'm finished anyway), got my trigger switch wedged in nice and snug where it's gonna sit. Man, when you said it was a tight fit to get all this in a intelli frame, you were'nt kiddin!! So, here's what i'm guessin gonna be my next steps. Gonna put a set screw in to hold the trigger switch in place (did you only use 1 set screw for the trigger switch? yes, my switch is pinched between the bottom of the hole for the trigger rod and the one screw, so it cant move, but 2 set screws will work the same. ), gotta put 2 stop screws in the trigger, get my noid, board, and ram all snugged together and hooked up( gotta ton of access wire it looks like), and probly drill out the hole in the bottom of my grip a bit to make room for my lpr hose and my warp feed wire.

    Now, you mentioned you had to cut some of your sear off? How much did you cut off? I can see why you would have to, as tight as the switch and ram are wedged in. it may not be required, it really depends on how everything is fitting together, but I ground the sear down slightly past the hole where the clevis attaches. My ram was hitting well above the portion I cut off so really it is not needed.

    Gonna be a red ULE, level X , warp left, X valved, intelli grip , setup. I cant wait to show the pics!
    cant wait for the pics! oh and one other thing, be careful when you tighten your grip screws, the way mine is setup the go right against the noid, but I shortened them so they tighten up on the frame be4 they pinch the noid.(you can see the impression of the screw in the tape in a couple of the pictures from test fitting)


    Quote Originally Posted by insixdays777
    Nice sleeper job! man that noid is TINY! find a better (your is good, dont get me wrong)way to hide that goofy vert LP hose and this thing will be PERFECT! GREAT JOB!!!
    what do you mean? its not even visible when the cover is on the reg. Anyway I got a new micro rock and put on there, now the reg doesnt protrude out the bottom of the foregrip. But the hose is still ran the same way....really its the only way I could come up with to keep the hose compeletly hidden. The tape is just there to hold it tight to the LPR. If you mean the placement of the hole that the hose goes through; it cannot be placed anywhere else, because if you look at the fittings on the RT pro forgrip, it is almost all hollow and pressurized.

  29. #29
    Join Date
    Nov 2007
    Location
    Shanghai
    Posts
    104
    Plain beastly!

    Kudos to you

  30. #30
    Join Date
    Aug 2007
    Location
    Indiana Pa
    Posts
    1,260
    Quote Originally Posted by ShotgunFacelift
    Plain beastly!

    Kudos to you
    Thanks!

Posting Permissions

  • You may not post new threads
  • You may not post replies
  • You may not post attachments
  • You may not edit your posts
  •