Original 68 Automag rebuild

Collapse
X
 
  • Time
  • Show
Clear All
new posts
  • Bagheera
    Registered User
    • Nov 2007
    • 302

    #1

    Original 68 Automag rebuild

    Hi everyone, first post, avid recent reader. Excellent stuff here in the forums, keep it up!

    Okay, on to the "how/why"....


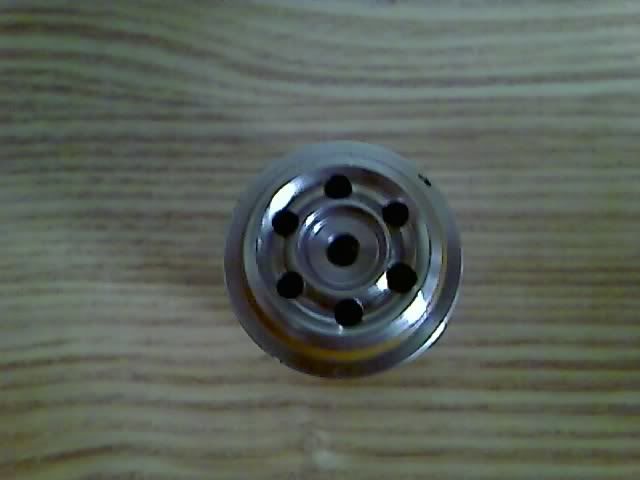
    I own an original 68 Automag, which I purchased and played with from about '92-'94, if memory serves correctly. The only mods to it was a "6 hole" mod made when I purchased it, which after reading recent posts and articles, is of dubious help to the accuracy of the gun.

    After reading up on the newest stuff, the anti chop bolt, new valves, bodies, etc. etc., I was wondering what should be upgraded, and what should be left bone stock. Granted, I know I will have to rebuild the entire thing with new seals EVERYWHERE (the marker hasn't been touched in over a decade.)

    As for what I'm using it for, when I get back into woodsball play, I would like to use it as I did in the past, namely low-volume, "marksman" (or "sniper" if you will) type play, which I did very well "back in the day." When I would go out for the day with buddies, I would use about 1/3rd of the paint they did, yet I was among the top shooters in terms of enemy eliminations. As you can see, I would like to continue that, but with some upgrades.

    As far as upgrades I've had my eye on, they include;
    Barrels - Stiffi, Wisper, or Hammerhead
    Body - Tac One Warp body
    Hopper - Qloader
    Air - sticking with CO2, but I would like to add an expansion chamber and a couple of regulators (or do I have this backwards, should it be one regulator and two expansion chambers?)
    Sight - Old sight is gone, so scope for scouting on top rail (and "Hail Mary" shots), and open DOT sight for close shots on side rail.


    Conversely, would it just be cheaper to buy a new or used TAC 1? But, seeing as how my original marker was so good "back in the day", I thought it would be neat to breathe new life into it.

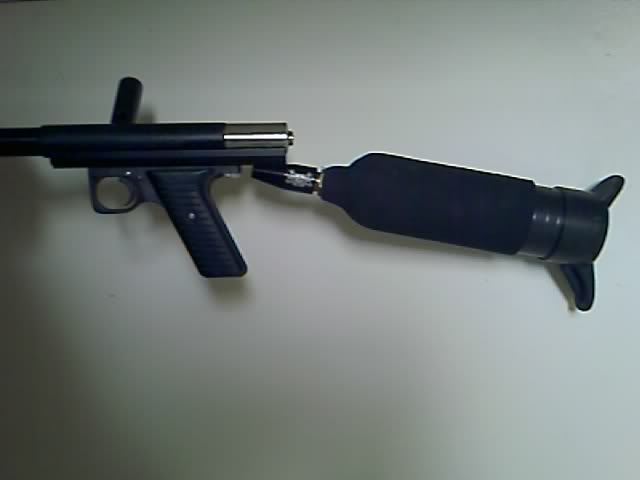
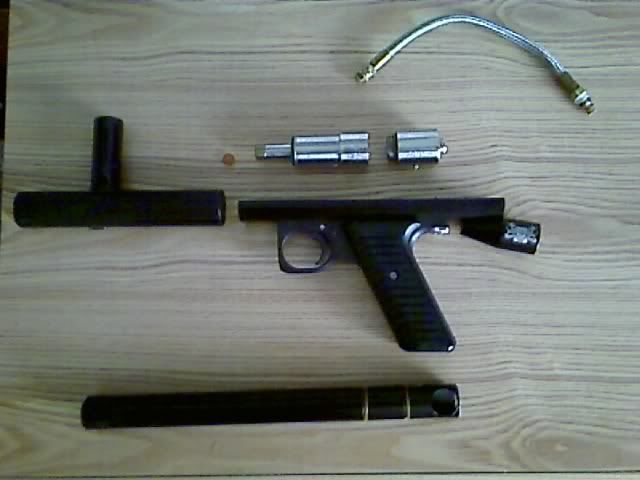
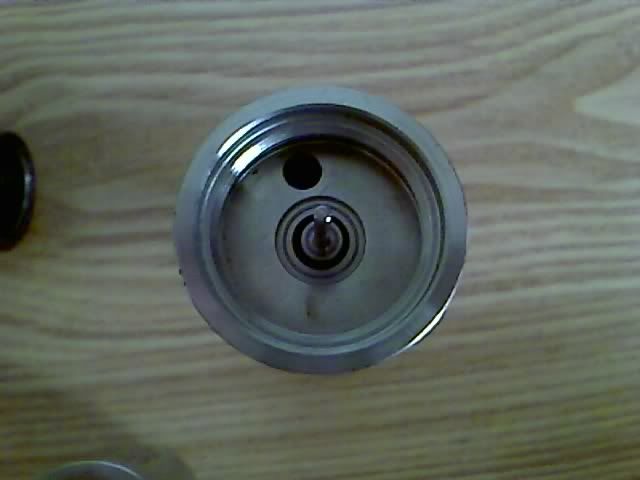
    As you can see from the photo, this thing is way old school, including the feed at the top which drops the ball directly into the chamber, rather than the later version of this body in which the tube looks welded onto the side with that cap at the bottom. I've always loved the tank where it's at, as the stock has always been very comfortable for me there, keeping the weight of the CO2 up against my body, allowing me to bring the gun to bear against targets quickly while either running & gunning, or (my favorite) ambush sniping.

    Had problems uploading the photos to the image gallery, so trying links to photobucket.


  • ljpiller
    Registered User
    • Nov 2007
    • 48

    #2
    A couple months ago I went through the exact same thing. I got an automag from 1993 that was virtually unused except for a couple times.

    Basically what I did was follow along the old Automag video on YouTube and make a list of things that needed replacing. Obviously the o-rings are going to need to be replaced. There are a couple other things that I found needed fixing up. Make sure you inspect the parts inside and out for any rust. I was able to sand off the little rust on the outside easily but it took me awhile to notice the rust on the inside of the mainbody - check everything. Make sure your mainspring isn't sagging beyond the front of your bolt. Also, if your barrel has any slop you may need to either replace the o-rings or replace it all together. Plastic detents in my opinion work a lot better, so I replaced the wire ones with those.

    Back in the regulator, the grease on the spring pack was pretty far gone and had gotten really sticky. I washed that off and re-greased it. Also, make sure you take out the piston and clean it off. Dirt can collect from dirty CO2 on the front. If you have a foamie bolt you will likely need some more foamies. In my case, I just replaced the bolt with a foamieless one. If you want you can even go for a level 10. The new bolts are a lot more lightweight anyways. You can also switch out the older wire

    They haven't really been improved upon over the years. They were pretty good to begin with. A repair kit contained everything I needed to get the marker to fire.

    For upgrades, it is completely up to you. I've kept mine stock, using even the same VL90 and elbow that came with it. An anti-siphon tank works wonders if you like to lay down on the trigger or find yourself shooting downhill. The only thing I am considering is a new barrel. Twist-Lock ones are hard to find. This isn't a problem if you go with a Tac-One body.

    Comment

    • ThePixelGuru
      Guru of Pixels
      • May 2005
      • 1461

      #3
      Nice old school 'mag. I'm not sure I would change anything.

      A word about regulators on 'mags: They don't need 'em. In most cases, it'll starve the valve and you'll get shootdown. The integrated reg in your valve does a better job than almost all aftermarket regs. If you don't shoot too fast and you're concerned about freezing your valve or liquid CO2, you could look in to a Sideline Stabilizer from Palmer.

      I say go out and play with it, then figure out what you really want to change. You might find yourself wanting to make only a little tweak, in which case you should just do that. If you want to make a lot of changes, just build a new 'mag and keep your sweet oldschool as a backup.

      Comment

      • Bagheera
        Registered User
        • Nov 2007
        • 302

        #4
        This is the same marker;


        How do I tell what level my marker is?

        Comment

        • Coralis
          Hyper Micro
          • Aug 2005
          • 1285

          #5
          Yours is most likely a level 5 or 6 since it has the 6 hole mod ... i believe the way to tell the level 5 mag is that your can unscrew the power tube from the valve (not just the tip).
          Btw with your current set up its going to be hard to put a reg/expansion chamber on the gun ,if you really have your set on doing this your probably going to have to mount your asa on the grip handle or have very odd looking set up.

          Comment

          • Jaan
            It's Pronounced *John*

            • Apr 2005
            • 1310

            #6
            I think you'd be better off buying a new gun, and keeping this one together for sentimental value. It's often cheaper to buy a gun whole then to upgrade an existing one. Besides, if the gun is so good as is, why fix what ain't broke? You can also get a nice mildly upgraded classic 'Mag for about $150 and mess with that one instead.

            If you want a Tac 1 you should know that the body takes Autocokcer barrels, not twist lock. So right there you're going to have to get a different type of barrel then you use now.

            The only thing I might do to that gun to keep it running good on CO2 is to put an anti syphon tube inside the tank (after getting it re-hydro'd of course) and a coil of hose going from the ASA to the valve. If there's anything old school it's a coiled hose. If I remember correctly you used to have to drill out the hole for the vertical ASA on those old rails and I wouldn't do that, just because it spoils the originality of it.

            If you get a Tac 1 whole, it will come with an X Valve, which can't use CO2, you must use HPA.

            I'd love to see an old 'Mag like this on the field. I know what you mean about how much fun it is kicking it old school...I've been using a stock class Phantom pump all year long, even at scenario games.

            Comment

            • Bagheera
              Registered User
              • Nov 2007
              • 302

              #7
              I'm definitely going with the Palmer stabilizer, I've seen nothing but good things about it.

              I'd rather get a new barrel, so I know I'll need a new body for the barrel. Plus, I fell in love with the TacOne Warp left/right bodies, and those nifty rails. (no more rail adapter yay!)

              I don't really need an X-Valve, so I'll gladly stick with CO2, plus I hate those giant wonky HPA bottles. CO2 is sexy and slim. (insert joke here)

              I've considered the level 10 bolt, but I was wondering, due to the extra action involved in the level 10, does it reduce accuracy per shot? Or, because it's a brand new bolt, (comparatively speaking) is it more accurate than the original bolt in this marker, with the added benefit of no chops? I don't sling paint all that fast because I really don't need to, and I've rarely experienced a chop in this thing, with most breaks I've ever had (very very rare) occurring where the body transitions to the barrel.

              As far as new vs. old, upgrade vs. not, I've considered this. Because this marker has been so good to me in the past, I see it more like a classic car (which I also own.) I can leave her parked in the garage, or I can give her a few upgrades and smoke the shiny paintjobby stickered up imports. Just for the record, my classic car is 99% original.

              Thanks for all the input, you guys rock!

              Here's some pics of the original marker disassembled;


              Last edited by Bagheera; 12-02-2007, 05:02 PM.

              Comment

              • Coralis
                Hyper Micro
                • Aug 2005
                • 1285

                #8
                Do you chop alot of paint ? If not I wouldnt worry about the level 10

                Comment

                • Bagheera
                  Registered User
                  • Nov 2007
                  • 302

                  #9
                  Originally posted by Coralis
                  Do you chop alot of paint ? If not I wouldnt worry about the level 10

                  Not really, no. When I did chop paint, it was because I was firing faster than my gravity fed (direct feed neck from a standard hopper) could feed the marker. With a Qloader and TacOne Warp body, this should be a non-issue now.

                  As far as it being level 5 or 6, what part is the power tube that can or cannot be unscrewed from the valve? As you can see from the photos, I can unscrew the entire valve in half, but can't all Mags do this?

                  Comment

                  • ThePixelGuru
                    Guru of Pixels
                    • May 2005
                    • 1461

                    #10
                    The power tube is the stem on the front of the valve that the bolt slides over.

                    Comment

                    • Coralis
                      Hyper Micro
                      • Aug 2005
                      • 1285

                      #11
                      Its a level 7 valve im pretty sure after seeing the pics

                      Comment

                      • Bagheera
                        Registered User
                        • Nov 2007
                        • 302

                        #12
                        Ah, cool thanks for the info. You see those six holes in one of the photos? That was an aftermarket mod. At the time, it was thought to even out the air as it went from one chamber to another, allowing for a more accurate shot. Is this true for this particular valve, or was it just snake oil?

                        I was screwing around with some concepts tonight, and this is what I came up with (it's still rough, and lo-res.) Right now I play a game called BF2142, and I love the look of the Park-52 Sniper Rifle in the game (plus it's my favorite weapon in the game.) I enjoy making new and unique things never seen before, so I thought I'd model a scenario mag on the Park-52, since no one has done it to my knowledge.

                        Images in order;

                        my original mag,
                        my mag with a Hammerhead barrel, Scope (whatever kind), Tac-One Warp Right body, Qloader
                        Park-52 modded Automag, the Park-52 shroud covering all bits but rails, handle and trigger,
                        The actual Park-52 as it's seen in BF2142
                        Another view of the Park-52 in the game, typically with wrappings around it.

                        More than likely I'm going to have to move the sight back. This is 100% going to need a lot more thought put into it, such as mask clearance, etc. etc., but I'm comfortable as to where the stock lies, since I've been playing with it like that since day 1. It lies exactly 16.5" from trigger to stock, and I think it's cozy.

                        This is just a blue-sky concept I'm playing with, so everything WILL change!


                        Comment

                        • secretweaponevan
                          Only HALF Polish!
                          • Sep 2007
                          • 1132

                          #13
                          Originally posted by Bagheera
                          You see those six holes in one of the photos? That was an aftermarket mod. At the time, it was thought to even out the air as it went from one chamber to another, allowing for a more accurate shot. Is this true for this particular valve, or was it just snake oil?
                          It was actually done to let the valve recharge faster as early 'mags were not index threaded between the reg and valve body, so sometimes the holes did not line up and it would take an extra teeny fraction of a second to get the dump chamber up to full pressure.

                          And yes, most things in paintball are snake oil. The only things that affect accuracy(precision) are consistency and paint to barrel match.

                          Comment

                          • FOG
                            FOG=FAT OLD GUY
                            • Sep 2007
                            • 245

                            #14
                            I hope u do mod it into the park55 that would AWESOME, and unique !, if ur gonna go cocker threaded barrel i would suggest Deadly winds carbon fiber i just got one an its Greeat!!,
                            It takes inserts so you can match ur barrel to ur paint= accuracy as well as very lightweight

                            Comment

                            • Bagheera
                              Registered User
                              • Nov 2007
                              • 302

                              #15
                              Originally posted by secretweaponevan
                              It was actually done to let the valve recharge faster as early 'mags were not index threaded between the reg and valve body, so sometimes the holes did not line up and it would take an extra teeny fraction of a second to get the dump chamber up to full pressure.

                              And yes, most things in paintball are snake oil. The only things that affect accuracy(precision) are consistency and paint to barrel match.
                              Glad to know the mod was useful, even if it's not for the reasons I had it done for. Hey, extra teeny fractions of a second count, no?


                              Originally posted by FOG
                              I hope u do mod it into the park55 that would AWESOME, and unique !, if ur gonna go cocker threaded barrel i would suggest Deadly winds carbon fiber i just got one an its Greeat!!,
                              It takes inserts so you can match ur barrel to ur paint= accuracy as well as very lightweight
                              I'm definitely between the DeadlyWinds Wisper and the Hammerhead Barrel, as far as reading up on them, and reviews go. I'm not too concerned with weight, as you can see there's going to be a lot of weight behind the trigger, so going with a metal barrel up front wouldn't make it front heavy. Also, the Hammerhead has the same system for inserts, called "fins".

                              The Park-52 is much cooler looking than the Zeller and the Moretti, plus the design of the gun is actually functional, as it has the front semi-vertical handle, plus the hand rest under the barrel, which will actually see use on the Park-52 Mag. Also, let's not forget, in 2142, the Park-52 has a higher ROF than the other sniper rifles, so it's the closest to a fast semi-auto as you're going to get in that game.

                              Here's another design I was messing around with. This one uses a front mounted 3.5 oz or 9 oz bottle. However, with the 9 oz, I'll need a really short ASA to make this work. Considering you get 150-200 shots out of a 3.5 oz, with a 100 round Qpod it doesn't seem like that big of a deal. This second design I like much better, as it has a much slimmer stock, and balances the weight of the marker out. In addition, it utilizes the design elements of the Park-52 much better, and the shroud actually becomes more useful to hold the various marker pieces together.


                              Images in order;

                              Park-52 as seen in BF2142,
                              Park-52 Mag
                              AutoMag with all parts mentioned earlier, plus a front mounted 3.5 oz co2 tank,
                              AutoMag with all parts mentioned earlier, plus a front mounted 9 oz co2 tank,

                              So, you can see how the Park-52 shroud and mounting parts cover the two guns on the bottom.


                              Last edited by Bagheera; 12-03-2007, 03:15 AM.

                              Comment

                              Working...