Pnue-*anything*

Collapse
X
 
  • Time
  • Show
Clear All
new posts
  • Toll
    Registered User
    • Jun 2005
    • 758

    #1

    Pnue-*anything*

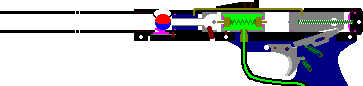
    After doing a bit of looking, I was just wondering what all would be feasable to add the pnue title to. I hate batteries with a passion so lets say it was a m98 with a cyclone feed not be a self sustained (so to speak) battery free marker?


    Would it apply only to things with a larger seer (spyders/pirahna/mags) or could anything have the process done to it?

    Just throwing that out there. Now that I have a basic understanding, I want to see what can be done with what.
  • FinchMan
    LVL10 classic minimag
    • Nov 2004
    • 459

    #2
    Pneumatic trigger action should work with just about anything you can cram the components into.

    You might need to make something fancy for normal seer trippers (anything besides mags and autocockers). Just so it doesn't pull the sear down until you release the trigger (full auto blender). but I'm sure it can be done.

    Comment

    • benzy2
      Registered User
      • Jul 2002
      • 546

      #3
      As finchman started to touch the problem with making blowbacks pneumatic is that they cycle continuously when the sear is held down. In an automag version you have the on/off close when you pull the trigger and you can hold the trigger back as long as you want and still you only have a single cycle. Cockers also only have a single shot no matter how long the sear is held down. You can hold the trigger back a fraction of a second or for an hour and as long as you pull and release the trigger once you only get one shot. On a spyder/clone holding the sear down lets the gun cycle and cycle and cycle. What you would need to do is have a setup similar to what is currently there. It is basically a sear on a sear. This way when the main sear is tripped it is still free to catch the hammer. Then when the small secondary sear on the trigger or in this case a ram of sorts is held open the main sear can still catch the hammer and then when the secondary trigger sear is returned the entire cycle can be repeated. The only real guns that can run totally pneumatic with ease beyond the autococker design are guns with dump chambers. Since they are wont let more air in with the trigger pulled it can be controlled easily with a pneumatic setup. I havent looked at a tippmann trigger enough to know how it works but I cant see it being much different than the sear on sear version of the spyder.
      Why doesnt anything work for me.

      Comment

      • Toll
        Registered User
        • Jun 2005
        • 758

        #4
        I'm just very interested in the prospect of making a pnuematic 98 with a cyclone feed as a completely battery free back up marker.

        Maybe by the end of summer I'll have thought of something, as a pnuemag takes presidence...Will be tinkering with a double seer idea though.


        Thanks

        Comment

        • FinchMan
          LVL10 classic minimag
          • Nov 2004
          • 459

          #5
          thanks for elaborating on that benzy2.

          I'd be interested in seeing what you come up with by the end of summer. And I may be able to help with some design aspects if you want.

          Comment

          • bbearboizz
            Registered User
            • Jan 2006
            • 27

            #6
            Theoretically it SHOULD be much easier with the Tippmann trigger style than the spyder's. I have an A-5 and I've been considering the same idea, after I do this to my 'Mag of course.

            The A-5 and M98 triggers are pretty similar so I think this can be of some help.

            First - Spotting the difference. If you find an E-spyder without the gripframe on, you notice there is this block of metal that sticks down from the body, inserting into the gripframe right? That is the sear. There is an electronically controlled actuator in the Egrip of the spyder. The problem is that this sear has one direction to go. And the electric actuator fixes the problem because it automatically resets itself pretty quickly so that the gun will not continue to cycle more than once.

            In a Tippmann, look at the *HUGE* trigger. Do you see that silvery metal piece that kind of wraps around the trigger? The metal piece can move forwards and backwards on the trigger, the spring keeps it in the backwards position (relative to when the trigger is in the gun). This little metal piece is the most ingenious part of tippmann's trigger design.

            What happens, is that the metal piece normally sticks out, holding up the sear. When you fire, the metal piece moves the sear enough to let the hammer go. Now, when there is no forwards pressure (which is applied by the hammer normally) the sear will move backwards (still relative to when you're pointing the gun forward). This backward motion clears the sear from the little metal piece. About now in the cycle, the gun has fired and the hammer is returning. The hammer catches the sear again, and the hammers *forward* motion pushes the sear back into firing position.

            However IF YOU HELD THE TRIGGER DOWN then you would NORMALLY think that the sear would be tripped again and give you full auto fire right? This is where the metalpiece+spring comes into play. The metal piece has some give to it remember, and when you hold down the trigger and the hammer/sear is reset, the sear is actually resting AGAINST the SIDE of this metal piece and actually pushing that metal piece closer to the trigger (compressing the spring) (if the metal piece is horizontal, as it usually is in firing position) and when you let go of the trigger, the spring/metal piece moves out of the way, and the sear is now resting against the TOP of the metal piece. You're ready to pull the trigger again.

            The trick here to replacing that metal wrap-around piece with a pneumatic piston that has the same effect. You need to position/create the ram such that it will trip the sear ONCE, and then allow the sear to rest against the SIDE of said ram until the ram is back into "ready-to-fire" position.

            My idea is this (i've been thinking about this mod for a long time now heh.) : You will need to saw off nearly half of the trigger, only keeping on the portion that allows the trigger to "swing" back and forth. You're going to need a bit of room for the ram positioning/spring. Based on the tippmann design, I propose that you position the ram so that when it fires, it hits the LIP of the sear, and then it pushes PAST the sear if you continue to open up the threeway. Now, this explains how to get the sear actuated at least once, and now it sets itself up for the "spring" mechanism quite nicely. Instead of making so that the MPA-3 is locked into the frame, you set it onto some kind of rod so that the entire actuator can swivel. Then, you should find a spring of proper length (you should probably find some kind of static counter-force in the trigger assembly to keep the MPA-3 from bouncing around) to push the MPA-3 into the correct position to of tripping the sear (which should only be tripped at the ledge remember).

            Based on this design, you pull the trigger, the actuator fires, hitting the sear. The sear trips the hammer (sounding familiar yet?) and the hammer completes the firing cycle. The sear that has now moved backwards (because the hammer was no longer there) and allowed the actuating rod of the MPA-3 to extend past the sear. The hammer returns, catching the sear and once more pushing it *forward.* But IF YOU HELD THE TRIGGER DOWN, then the actuating rod should still be in the way. The sear will push the actuating rod (partly swiveling the MPA-3) out of the way. Now the Sear/Hammer portion of the gun is ready to fire. The trigger part is not, yet. When you finally decide to let go of the trigger, the actuating rod of the MPA-3 retracts, the *spring* portion of this setup pushes the MPA-3 (swiveling a lil once again) back into position so that the rod is only pointing towards the lip of the sear. Now the entire gun is ready to fire again.

            HOPEFULLY this LONG LONG post made sense to SOME of you and you can further help develop this design/idea. I tried to make it so that you could imagine it in your head, as that was the easiest way for me to understand the point of pneumatics at all.

            BTW, the tippmann gripframes usually have a place set apart for the RT, i think mounting a 3way into there would be quite easy. theres even a hole to stick the rod through to reach the trigger! no excess milling necessary there! w00t.

            Comment

            • Toll
              Registered User
              • Jun 2005
              • 758

              #7
              Excellent post, I think I catch your drift, but would you by any chance have a visual representation handy?

              Sadly I'm a visual learner, but it's nice to have some one who understands them that well handy.

              Comment

              • c0rpse
                Pneu, Spider, E, I, X
                • Apr 2006
                • 60

                #8
                Wouldn't it be a lot easier to use a fabco os-1 pulse valve to actuate the MPA-3?

                Comment

                • FinchMan
                  LVL10 classic minimag
                  • Nov 2004
                  • 459

                  #9


                  i hope that sorta helps...

                  Comment

                  • bbearboizz
                    Registered User
                    • Jan 2006
                    • 27

                    #10


                    the first is the original setup of the gun, provided by finch. the second is my "proposed" setup of the trigger system. the pink is the 3way, the red is the mpa-3 + actuator rod, and the green (hard to see i know, but its there, between the red and the pink) below the mpa-3 is the spring (i guess its also possible to put the spring on the other side of the mpa-3 and have it PULL the mpa-3 into position. Depends on preference and room.)

                    so yea. I'm sorry, but im not good enough with paint to actually create an illustration of how the metal piece works.. but.. to really see it, simply open up your m98, and simulate the way the gun fires by pushing your finger against the sear, as if your finger was the hammer. Notice the position of everything, then pull the trigger while your "hammer" is still applying force. notice how your "hammer" slides past the sear, and where everything in the gun goes. Then, "return" your "hammer" by sliding it back and then once again pushing against the sear. Be sure to hold the trigger down, and then you'll really see how the metal piece works, and you'll see how the positioning of the mpa-3 works to simulate it.

                    Comment

                    • FinchMan
                      LVL10 classic minimag
                      • Nov 2004
                      • 459

                      #11
                      you'd probably want to do this with a double trigger frame anyways, so i'm sure you could find room.

                      Comment

                      • bbearboizz
                        Registered User
                        • Jan 2006
                        • 27

                        #12
                        well for the a-5, to get a double trigger you replace the trigger guard and the trigger.. you don't actually buy a new frame.

                        And for the 98, i don't think the gripframe is removable.

                        However, the A-5's gripframe is plastic, so it definately shouldnt be hard to MAKE room heh.

                        Comment

                        • c0rpse
                          Pneu, Spider, E, I, X
                          • Apr 2006
                          • 60

                          #13
                          I want to try this in my prolite like pictured, but I'm not convinced that it will work.

                          Comment

                          • bbearboizz
                            Registered User
                            • Jan 2006
                            • 27

                            #14
                            Then don't try. If you're not convinced it'll work, don't try.

                            Leave it to someone else to make the first one. SOMEONE has got to try, but you don't have to .

                            Comment

                            Working...