I like what you have going on here. I am still trying to figure out why this specific rail is more desirable for this mod?
The out of the box projects that are going on these days are pretty cool. Glad to see some offbeat ideas coming to fruition.
-
On a different rail I tried at one point I had drilled and tapped a shallow hole in the reg end of the valve. Just enough to get 3 turns of a bolt. When I bolted on the frame, the bolt went thru the frame and rail and grabbed on the valve to tighten down. It is unnecessary on the rail pictured above. The body bolts to the rail and the fitting goes thru the rail and hold everything in place.Leave a comment:
-
very interesting, this is my next project.
did you make a new 10-32 hole to hold the valve or does the straight fitting (i assume) hold it inLeave a comment:
-
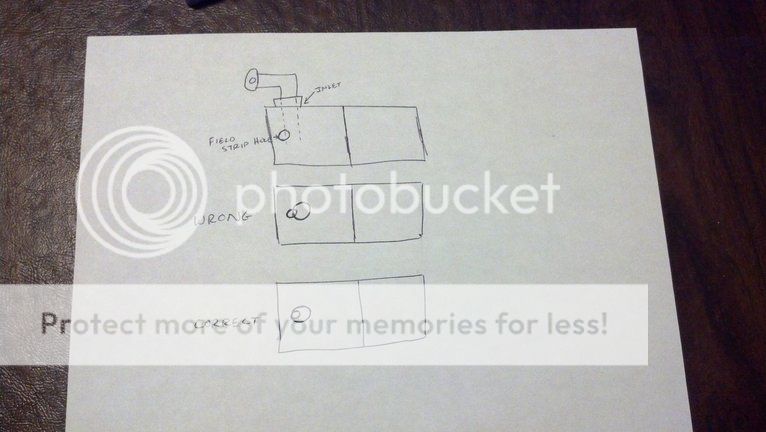
I drew a picture real quick to kind of explain it better. Basically if you drill the hole exactly where the other inlet is but on the bottom it will not work. You need to move the hole you are drilling over the field strip hole.
Leave a comment:
-
To get it to seal up right you have to remember the field strip screw hole is there. The outside diameter of the hole you are drilling and tapping has to cover the field strip screw. If you put the hole exactly where the other inlets are, except its on the bottom of the valve, you will have half of the field strip screw hole still exposed. I made that mistake and ruined one X valve which ended up being filled in with JB Weld and done again. I drilled the pilot hole first which was the same size as the inlet to the regulator. Then I switched to the bigger bit that encompassed the field strip hole. And finally ran a tap.Leave a comment:
-
-
I did take a pic earlier when I was testing this before putting all together. One of the other tanks I had here has alot more air in it to test for leaks which is why I had it put together this way.

Leave a comment:
-
I did what Flatliner did. I drilled and tapped a new air port on the bottom of the valve where the field strip screw used to be. I have a straight macro fitting coming thru the rail. Thats why Ive had my eye on this frame for a while. It has that snatch grip area that goes all the way to the back of the rail that is empty. The air line comes down into that part of the frame and bends around. In the pics above the airline is ran and connected already. I left the grip panels off to show its there sort of. I will take it apart tomorrow and get some pics of whats going on in there.Leave a comment:
-
OK , so I had some time today to get back on track with the Quest project. I was able to get the Omega rail drilled and tapped to mount the frame to and get the hole cut for the air line to pass thru. Using this rail also allows me to move the front grip further forward which was of importance to me. I did switch the foregrip because I had an angled vasa I wanted to use. The grip for now is the reg off of the Quest donor gun. As usual my scuba is empty and I have 600psi of which to test with. I had another setup to test the valve under full pressure and I had no leaks in my work to this point. I like using the Max Flo because I have a center output that lines right up with the bottom center of the frame. I havent gotten the sear and trigger done yet as I may still go with pnuematics. Heres some pics:


Leave a comment:
-
Fish tank update:
I got the sand washed off and put into the tank. Rinsing the dust off of 120 lbs of sand in my shower in a mesh bag makes a hell of a mess. Then I added water and treated out chlorine and nitrates. Added somewhere around 30 lbs of salt. I had prepaid last week for a big piece of live rock the fish store had so I went and picked that up. They were out of other big pieces so that will have to wait until later this week. It now has to cycle for a few days before adding fish. Heres what it looks like now:

Leave a comment:
-
Dood that fish tank is Sa WeeT!!! cant wait to see pics of it all done yo!!! that Mag is looking great too...cant wait to see a video of that shootin man!!!
Leave a comment:





Leave a comment: