Cyco-Dude's project blog

Collapse
X
 
  • Time
  • Show
Clear All
new posts
  • Cyco-Dude
    • Jun 2026

    #1

    Cyco-Dude's project blog

    Hello, and welcome to my project blog! I build / fix / tinker with a lot of automags, so I figured I may as well take some pictures and show people. Hopefully this will encourage me to work consistently so I can post regular updates to this thread. Most of this will be busy work, nothing special (cleaning stuff, rebuilding valves mainly) but it needs to get done. You can see my first emag project here.

    Some quick info and myself, I started playing paintball in the mid-ninties using rental PGPs and later my Tippmann SL68-II. I took a 10-year break around '99 (skipped the electronic revolution; I don't think I missed all that much) until a few years ago when I received a Tippmann A-5 for Christmas. It's nice, but I was always curious about autocockers and automags; the two dominant tourney markers from when I first started playing. Long story short, I liked the simplicity of the automag and so I bought one. A year and a half later i've got myself a nice pile that just keeps getting bigger:
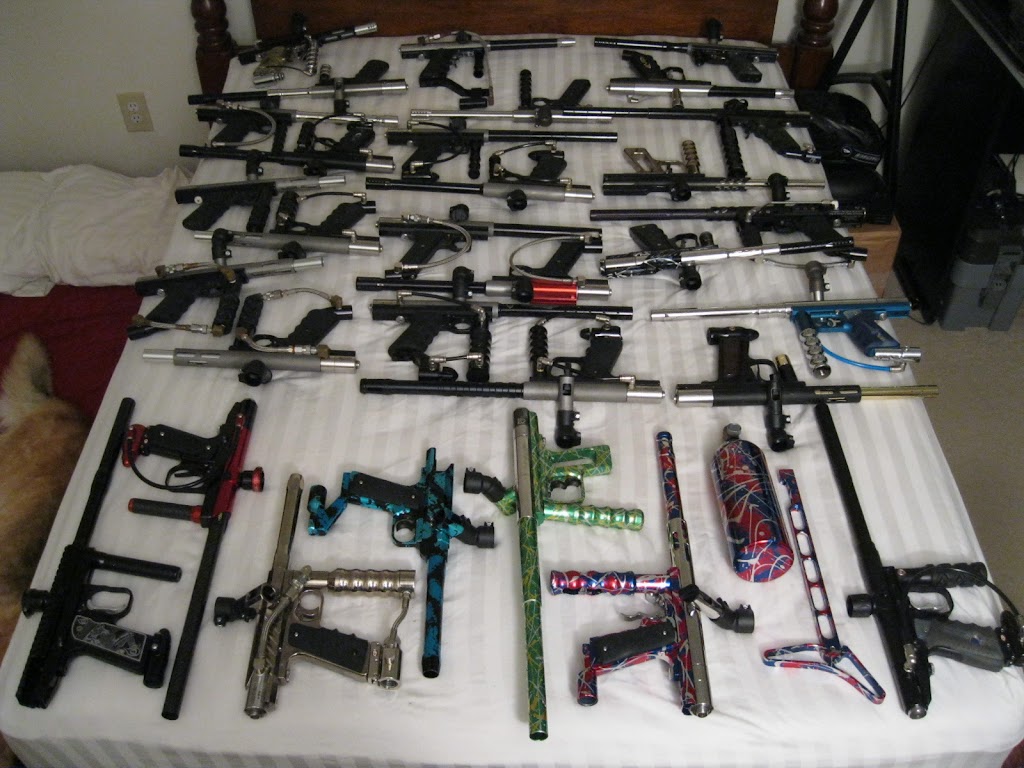


    Project 'mag list:
    • red ule: completed
    • blue ule: completed
    • tac-1: completed
    • stainless emag: back-burner
    • vert frame ule: back-burner
    • pk splash retromag: back-burner
    • stainless retromag: back-burner
    • black teflon rt pro: completed
    • painted rt pro: back-burner
    • dust black micromag: awaiting parts
    • blue nights splash micromag: completed
    • ultra nickel micromag: back-burner
    • rt classic #2: completed
    • rt classic #3: back-burner
    • rt classic #4: awaiting parts
    • rt classic #5: back-burner
    • john gross splash minimag: back-burner
    • centerfire minimag: completed
    • centerfire minimag #2: completed
    • centerfire minimag #3: completed
    • black teflon and brass minimag: in progress
    • polished stainless and brass minimag: awaiting parts
    • stock minimag #3: completed
    • gray splash eclipse automag: back-burner
    • polished stainless and blue automag: back-burner
    • automag #2: back-burner
    • poo mag: back-burner
    • junk mag: back-burner
    • junk mag #2: back-burner
    • rental mag: back-burner
    • black and nickel project mag: back-burner
    • black smart parts project mag: in progress
    • vert-feed project mag: back-burner
    • friend's automag: in progress
    Last edited by Guest; 07-19-2015, 08:18 AM. Reason: updated project status
  • Cyco-Dude

    #2
    I'll start this off with a couple of valve rebuilds; a retro valve I bought here and an RT Pro valve that came with a Tac-1:


    Disassembled, cleaned, o-rings changed, fresh grease on the springs, fresh anti-seize on the regulator adjustment nut. Polished the power tube and on/off bottom; the bolts will be sanded and polished later.

    Next, I have this micromag that needs some work:


    It was broken down and washed after this picture was taken. Here's the valve rebuild in progress:


    It was a mess lol! Old o-rings aplenty. The regulator body had also seen better days. Before and after:


    The regulator body was damaged by the tourney lock (I hate tourney locks!). I refinished it by wet-sanding it on some 320 grit sandpaper until all of the gouges were gone. I then moved on to 400 grit (or something, I don't know lol) to remove the scratches from the 320 grit. Once that was done, it was time to put the swirl marks onto the back of the body.

    As these parts are made on the lathe, it leaves fine swirl marks. I emulate these marks by twisting the reg body in place on top of 320 grit sandpaper. If you can keep the piece still, you'll end up with fine, concentric scratches that mimic the look of an undamaged valve. You can see them in the last picture...I do this with every regulator body that has been damaged by stupid tourney locks. I don't just make parts work, I try to make them look good too! Moving on...


    An X-valve rebuild in progress. I have a lot of things in progress...lol time to get back to work and finish them up!
    Last edited by Guest; 03-24-2015, 05:04 PM.

    Comment

    • OPBN
      OldPBNoob

      • Sep 2008
      • 5240

      #3
      Nice collection, but a lot of redundancy.
      My AO Feedback

      Comment

      • Cyco-Dude

        #4
        Originally posted by OPBN
        Nice collection, but a lot of redundancy.
        the idea was to sell most of these, so that's ok.

        Comment

        • OPBN
          OldPBNoob

          • Sep 2008
          • 5240

          #5
          Yikes. You may single handedly skew the market prices for awhile. lol.
          My AO Feedback

          Comment

          • Cyco-Dude

            #6
            Update time...

            The micromag and X-valves were finished up, as well as another X-valve that I started on before:


            Three down, 13 to go! Moving on to a side project; cutting a Venomous Designs foregrip down. The carbon grip was 4.75", which was a bit longer than I wanted.


            The area to be cut was taped and marked, then clamped into a miter box. The tube will be shorted by 1.5".


            A minute with a hacksaw and a 32 tpi blade and it's all done; the cut end was cleaned up with some sandpaper.


            I had to cut down the mounting bolts by 1/8", as the 1/2" bolts were too long (worked fine on Lukes and DW grips though!). I also had to replace the bolt that holds the grip together with a shorter one...nothing like spending $4 to ship a $2 bolt, but I guess it can't be helped. Here it is all together and bolted to the rail:


            Setting aside the micromag for the time being to get this done sooner rather than later:


            A centerfire minimag, in excellent condition! It'll be disassembled and washed as always; onwards with the valve rebuild currently in progress:

            Last edited by Guest; 02-16-2015, 10:52 AM.

            Comment

            • swe_crazy

              • Dec 2011
              • 412

              #7
              I need to do this with my automags too ... one day.
              I have too many projects that I am working on. Have a larger project that I need a euro x-mag body to finish and four half-finished pumpmags and a E-Pneumag etc ... book a plane to Sweden and help me, I'll buy the beer.
              My Feedback

              Comment

              • Cyco-Dude

                #8
                Originally posted by swe_crazy
                I need to do this with my automags too ... one day.
                I have too many projects that I am working on. Have a larger project that I need a euro x-mag body to finish and four half-finished pumpmags and a E-Pneumag etc ... book a plane to Sweden and help me, I'll buy the beer.
                lol maybe if i ever finish with what i've got...

                Comment

                • Cyco-Dude

                  #9
                  Update time! Centerfire valve rebuilt:


                  Now it's time to deal with that feedneck...


                  It was clamped to the table and 1" was cut off with my hacksaw. The neck was supported with a couple of popsicle sticks, that way it was level as I cut it. The cut end was ground flat with a dremel using a course sanding drum, then de-burred using a fine sanding drum, then wet-sanded with 320 and 400 grit sandpapers, and then polished with the dremel using emery, tripoli and white rogue compounds on felt buffing wheels. It was topped off with a Palmer's clamping feedneck.

                  Next, I had to address a small issue with the frame:


                  One of the screw holes was cross-threaded. Easy fix with a 8-32 tap:


                  Now there is something that resembles threads in there; the grip screw goes in just fine! It turns out that the hole spacing on the Dye grips was not correct, which probably caused the issue. They were swapped out with the grips that came on my Tac-1. Here's the minimag as it stands, ready for testing:


                  It won't stay like this; it'll be finished up later this spring. Speaking of Tac-1, here is what I started with:


                  Nothing special, CCM feedneck, RT Pro valve with a .725" on/off pin, RPG shadow rail. I think I can spiff it up a little bit more. The RTP valve was swapped out with one of the X-valves I rebuilt above, along with a few other pieces. It's done for the time being; i'll take pictures later this weekend.

                  Moving on to the blue ULE project! I got a rail for it that came with a sear. Unfortunately, the sear was chipped and needed to be replaced:


                  Too bad the sear axle was broken, and jammed in the rail!


                  To get it out, I took a piece of macroline that was a snug fit on a sear axle (I tested with a spare one I had), and ground the macroline down so it would fit in the rail. I then put some gorilla brand crazy glue inside, stuck the macroline over the broken axle in the rail, and let it dry for an hour or so.


                  Success! As of right now, I just need one more item to finish the blue ULE. More updates later tonight...i've got an RT classic I want to get done for tomorrow's game!

                  Comment

                  • Cyco-Dude

                    #10
                    Good grief, i've been slacking! Where am I at? Well, I swapped triggers in a couple of frames for the Tac-1...the gloss frame got a blade trigger from a dust frame that i had. I've got the dust frame on the Tac-1 now, but might change back to the gloss frame. We'll see...swapping a couple of X-valves around as well; for the time being the Tac-1 is done. Pictures of that to come later. Speaking of pictures, my red ULE is done:


                    Moving on, the valve for the RT Classic #3 was rebuilt:


                    Right now, the RT needs an ASA, a hardline (or not, we'll see) and whatever hoses. It goes on the back-burner until I can get the parts I need.

                    Progress was also made on the black micromag:


                    The grips were changed out for some black Dye Sticky 3's, as well as the safety and aluminum trigger that were swapped over from a donor frame. Much better! Here's how it currently sits:


                    All it needs is a new ASA (as the one that it came with is a little too beat up), and the necessary steel braided lines and it'll be good to go!

                    What else so far...a valve detailing and some barrel polishing:


                    Finally, I bought this from a member not too long ago:


                    Expect a quick update on that soon!
                    Last edited by Guest; 03-24-2015, 12:11 AM.

                    Comment

                    • Cyco-Dude

                      #11
                      Let's start off with the Tac-1. Tested it out last weekend and it worked great!


                      Here's the progress on the vert ULE:


                      It will be finished at a later date, but it goes on the back-burner for now. Other projects need time at the moment, and i'll try to finish them up this week. Completed so far:


                      An old 68 Automag A.I.R. valve, complete with foamie bolt and power tube spring (well...that was replaced with a brass spacer).


                      Air America Apocalypse 2k rebuild. Pretty straight-forward; if you can rebuild a reg on you classic valve you can rebuild one of these. Once you remove the four bolts that hold the two halves together, the regulator just pulls apart. The piston o-ring is the same as on an Automag, and the o-ring on the on/off knob that seals the flow hole is the same size as a regulator seat / lvl 10 o-ring. The other two o-rings were the next size larger than the piston o-ring...size 013 I believe. I forget the size of the regulator body o-ring (it's not the same as any Automag valve o-ring though).

                      I just changed the reg seat (with an Air America reg seat) and the small on/off o-ring, since those were the only o-rings I had at the time. Fortunately the other o-rings were fine. The gauges that came on the regulator were bad and were replaced with new blackout gauges, and the o-ring in the fill nipple piston was replaced. The tank (which was hydro'd recently) was filled to 500 psi and is holding steady. If you rebuild one of these, you want to tighten the four bolts down in increments, and always work the bolts in a criss-cross pattern.

                      Last but not least, a ReTro valve that was detailed and had a level 10 bolt installed:


                      This was also tested this past weekend, and ripped. I guess a ninja SHP regulator and a .745 pin will do that...20 bps average! I wonder what it would do with a .750 pin? Have to tame it a little bit, I think lol.
                      Last edited by Guest; 04-20-2015, 04:37 PM.

                      Comment

                      • UncleStasiu
                        Registered User
                        • Apr 2014
                        • 81

                        #12
                        Where did you you get those gauges, if you don't mind me asking? I can't find a matched set of 1200 and 5k black gauges for the life of me.

                        Edit: thanks for posting this stuff, BTW. Looks great, and I restored a classic valve thanks to your tips!

                        Comment

                        • Cyco-Dude

                          #13
                          I got them from Hustle Paintball's ebay store...here's the 5k and here's the 1.2k. Add them both to your cart, then click request invoice. It was $18.98 shipped first class, or 20.98 shipped priority (first class is plenty fast).

                          Or, for a few bucks more you can get a set a agd gauges!

                          Comment

                          • Cyco-Dude

                            #14
                            Update time! Here's the second RT Classic that was done a while ago, but didn't take pics until now:


                            Moving on, the old 68 Automag AIR valve I rebuilt earlier belonged to my friend's Automag. It came looking like this...


                            ...and ended up like this:


                            I just have to polish the barrel up and it should be good to go. I'll test it out this weekend.

                            Moving on...a few valve rebuilds. First up, my friend's ReTro valve:


                            Then his centerfire valve:


                            The back of the regulator body was slightly marred by the tourney lock...so i decided to refinish it as it wouldn't take long. Before and after:


                            And here they are, all ready to go:


                            Both valves were tested and chrono'd...the ReTro needed the powertube o-ring replaced when I tested it but it's fine now. The ANS bolt on the centerfire valve was replaced with an AGD bolt.

                            Picture of my friend's centerfire Minimag as it sits:


                            Moving on to the centerfire that I recently acquired:


                            And here is how it sits currently. I'll change it up eventually, but I want to use it the way it is before I start swapping things around.


                            Last but not least, the RT Pro i've been picking at. The valve and tank regulator were rebuilt earlier, so it was just a matter of washing everything and getting the hose connected.


                            I'll break this beast out later this month...it's going to be heavy as hell once it's filled with air and paint!

                            Comment

                            • freedummy
                              Registered User
                              • Apr 2014
                              • 3

                              #15
                              Wow, jeez! At first when I saw you snapping up all the AGD action on MCB I was worried you were hoarding mags, but I can see you've got a real passion for resurrecting and restoring. Many beautiful pieces here, and you're doing great work with them.

                              I was stoked when I snagged my minimag (I thought you would beat me to it), but now I only hope I can do half as good bringing it back to life!

                              Comment

                              Working...