my first ep mag...intelliframe...lots of pics

Collapse
X
 
  • Time
  • Show
Clear All
new posts
  • Hilltop Customs
    Registered User
    • Aug 2007
    • 1260

    #46
    No problem, I bet your questions will help a lot if anyone reads this in the future and tries to do the mod

    I hope yours works as easy as mine did....I just gassed mine up to check for leaks and accidently bumped the trigger and "bang bang" and after that I couldnt stop dryfiring till I bled 2 scubas dry.

    post up pics or a vid if you can! Ive been too busy with summer classes and work to go play(i get my scubas filled right be4 going to play) or I would have posted one by now.

    Comment

    • Hgblues
      Registered User
      • Jul 2004
      • 128

      #47
      UNBELIEVABLE!

      Now, i'm used to heavy construction, and i'm the first to admit I dont have the hands of a surgeon or electronic technician, but I DID IT!

      Hilltop you did a great job with the dremel and the wires, as mine is not quite as neat. I think the next one I do will be much more preofessional looking. I dremel'd out the inside of my Dye sticky grips to give me a little more room, and now they lay flat on the frame. Stuck the air to the gun, and a X valve that hadn't been fired in 5 years started poppin like it did brand new out of the box ! I shot 3 pods of some old paint I had left from a tourney i played several months ago, set on psp ramp at 13 bps. Zero paint chops, the level X saved a few breaks, and the thing shot like a laser.

      I'll see about getting some pics and/or video up soon. Probably youtube the video or somethin.

      OH, I weighed the whole setup, because everyone says how heavy mags are....with the gun, dye drop forward, warp feed, revy hopper, crossfire 68/4500, 14 j j edge barrel, It weighed 8.8 lbs. I weighed a DM4 with just tank and hopper that weighed 7.6 lbs. So the only difference in weight was the warpfeed. I figure a real man wouldn't whine about carrying an extra pound .

      Comment

      • MagModderMatt
        Engineer & Paintballer
        • Apr 2008
        • 59

        #48
        Im makin a sleeper with same rail and grip Q's

        ok I have a couple questions. First (your sleeper is by far better IMO.
        Im switching from a Spydermag with a
        t-board to a sleaper EP mag.

        Question one, How did you put an LPR where the orginal front grip is? it doesn't unscrew.. did you tap new holes after cutting it off?? (thats what it looks like) Please tell me how the hell you did that?! it doesn't unscrew, Did you tap new threads with a drill press? or just use a regular drill and bench? you did an amazing job, I've been moding mags for 13 years, you have the best sleaper I've seen next to the Electrician. Great work! please let me know what EP parts you are using! thanks

        Two, Are you using a UTB board ? that's a tiny lil board, I am going to use one, and W/ the stock RT on/off expect atleast 30 bps cuz its faster than ULT recharge rate. The
        UTB is the best board for EP mag's I think, Tiny virsitile, and FAST as hell (and it has a eye programing mode).

        Finaly three. What noid do you use? is it that small one that Air Solder sells? model # pls
        I love the all black sleeper look you have goin, most people wouldnt even know it's not just an RT till you shoot a rope of paint at them!!

        My (spydermag Almost done just need T-board) (Im guna make a EP with intelligrip and the UTB) my spydermag will smoke all others with a T-board.
        I cant wait till my sleaper is done! BTW, pneumags work great with regular RT on/offs even with the heavy pull, they recharge faster too! (you just need pneumatics + electronics that can take about 300 psi probly can get away with 250psi. (im not gunna use a ULT I have a regular RT banjo bolt valve)

        I found someone that will do the milling!! Tunaman!! thanks tuna He has my valve right now. as far as I know, he is the only person willing to do it still and very cheap from a person as well known for his excelent work $31 including shipping.. for the ULT Milling.
        NO ONE ELSE WILL DO THIS ANYMORE here he is site =.tunamart .
        I now have a tuna mag he's good, and inexpensive for milling stainless steel to those tolerences (he has done lots, none have gone bad) all work! so if you need it, (I checked) no one else does it anymore period. And Tuna is a Profesional. Hope he gives me tuna stickers for my Pulse
        Last edited by MagModderMatt; 06-09-2008, 11:25 PM. Reason: found someone to do the ULT milling!!

        Comment

        • Toll
          Registered User
          • Jun 2005
          • 758

          #49
          Nice shocker ^.^


          I ofcourse kid. Looks good, no one would see it coming.

          Comment

          • Hilltop Customs
            Registered User
            • Aug 2007
            • 1260

            #50
            Originally posted by MagModderMatt
            ok I have a couple questions. First (your sleeper is by far better IMO.
            Im switching from a Spydermag with a
            t-board to a sleaper EP mag.

            Question one, How did you put an LPR where the orginal front grip is? it doesn't unscrew.. did you tap new holes after cutting it off?? (thats what it looks like) Please tell me how the hell you did that?! it doesn't unscrew, Did you tap new threads with a drill press? or just use a regular drill and bench? you did an amazing job, I've been moding mags for 13 years, you have the best sleaper I've seen next to the Electrician. Great work! please let me know what EP parts you are using! thanks

            Two, Are you using a UTB board ? that's a tiny lil board, I am going to use one, and W/ the stock RT on/off expect atleast 30 bps cuz its faster than ULT recharge rate. The
            UTB is the best board for EP mag's I think, Tiny virsitile, and FAST as hell (and it has a eye programing mode).

            Finaly three. What noid do you use? is it that small one that Air Solder sells? model # pls
            I love the all black sleeper look you have goin, most people wouldnt even know it's not just an RT till you shoot a rope of paint at them!!

            My (spydermag Almost done just need T-board) (Im guna make a EP with intelligrip and the UTB) my spydermag will smoke all others with a T-board.
            I cant wait till my sleaper is done! BTW, pneumags work great with regular RT on/offs even with the heavy pull, they recharge faster too! (you just need pneumatics + electronics that can take about 300 psi probly can get away with 250psi. (im not gunna use a ULT I have a regular RT banjo bolt valve)

            If you know of anyone who will do the on/off milling still let me know!! id rather do it that way. (I know the I'm running a big risk milling to fit a ULT on my valve) :spit_take
            Im willing to take the risk, If you know if someone who will do it.
            Thanks,
            Matt

            LPR- sawed off then tapped to the 1/8" npt, one hole in the bottom, and another hole sticking out the right side.....and finally the hole for the airline(was drilled when assembled to the rail so it would line up) Yea I used a drill press, its as straight as I could make it without making a jig up.....it has a tiny slant to it, but you would never ever notice unless I told ya.

            You got it right, UTB and the solenoid that ASP sells. I forget the part #, but its the only noid ASP sells that looks like the one in the pics. If I had it to do over again, Id consider the noid p8ntbal4me says he has....but that would require a whole different assembly than it is currently because his noid is a tiny bit bigger. His noid is supposed to cycle faster and also be able to hold more pressure.

            I was really considering picking up and old RT to put an ep grip on....I just loved the way they look. Only downfall is powerfeed and twistlock barrel.

            I'm not aware of anyone doing it, might want to make another thread to ask....probably get more views that way.

            Comment

            • Hilltop Customs
              Registered User
              • Aug 2007
              • 1260

              #51
              Just to add about the LPR.....you have to drill both the holes deep enough that you can tap, but not too far as to weaken the LPR too much. And its best to get the depth right the first time, or you will have to drill deeper when threads are there

              It would probably be best to use the part thats chopped off of the foregrip to practice once if you havent drilled and tapped many holes.

              Hgblues- getting the wires right was a pain. I found it easiest to put the stuff together how it was in the grip and measure out how far the leads had to be.....still didnt turn out perfect, but its good enough for me. I bet ripping on for the first few balls made it all worth it

              Comment

              • MagModderMatt
                Engineer & Paintballer
                • Apr 2008
                • 59

                #52
                Thanks Hilltop, I will practice on the part I cut off before I tap the real thing, I just needed to know how you did it so I could keep my origonal "RT Look" grip. I might try that EP solenoid that holds higher Psi, I will probly use a regular RT on/off for a bit faster recharge rate, (will need all the extra psi I can get) if it wont work, I will find a local machine shop to mill out the on/off of my classic RT valve to fit the ULT. Most people wont risk it, even though I told them I would not hold them responsable if it ends up destroying the valve
                (I have a classic valve as a backup)

                Again that sleeper looks like a stock RT pro noone would be the wiser till you the crap out of them haha

                Thanks,
                Matt

                Comment

                • Hilltop Customs
                  Registered User
                  • Aug 2007
                  • 1260

                  #53
                  finding the part of the foregrip to drill is the hardest part....

                  for the center hole you just have to measure until you have the center point(they make a tool for finding the center of a ciricle, but i didnt use it and cant think of the name) Just measure across the diameter a few few times....you should find the center after measureing 2 times, but verify by measuring a couple more.

                  The 2 that go in the sides are harder, and it is best to have a drill press and a small drill press vice for this. Attach the foregrip to the rail and clamp it in place so the rail is level. Now to center the bit on that high point take your drill press and slowly lower the bit down it down as you move the vice around...when the barely touches the foregrip is going to be the highpoint, and where you want to drill.

                  For the hole that goes between the grip frame and foregrip, once again mount the foregrip to the rail this time backwards so you will be drilling the hole at the front of the rail, and then rotating the foregrip around. Now clamp the foregrip itself into the jaws and make sure the rail is hanging vertical(both the side and top of rail is vertical) This assures you that once again the highpoint is where you want to drill.....follow the same method of moving the vice and lowering the bit...

                  If your going to drill with just a drill and not a press, it wont be straight.....unless you have some magic or are extremely lucky. thats not to say it wont work, it just will be nearly impossible to get it straight

                  Also do not forget while drilling out your foregrip that the original screw holes in the top(where it mounts to the rail) are pretty deep, and if you accidently pass through one, you will have to seal those screws in with some teflon tape. Try to avoid it if you can.


                  This was easily the hardest part of the entire project.....I wouldnt reccomend doing it without a press and vice.....

                  Comment

                  • MagModderMatt
                    Engineer & Paintballer
                    • Apr 2008
                    • 59

                    #54
                    I forgot to tell you, I can do cocker threads and vert feed!

                    I can get Doc's mag to cocker threaded adapter for barrel, and Luke does a vertical feed (slightly offset) to the RT body, I just cant go with eyes, or the dual dentent's. Check this out though. Im gunna go with the faster noid (my grip has TONS of space) and keep my upper lookin pretty much exactly like yours (but with a classic RT body) withTHIS mod (look half the way down the page to see the vert mod..he does other stuff you may want for your ule body and ule milling for intelliframes.. He lives like 40 miles from me so I can drive the parts to him and pick em up when he's done He does great work, When I get my RT body done like that I will show you, Think I should go polished or powdercoated black??, it will look sick. and No one would think to wounder if it even is an automag with my valve covered by the body almost all the way.. They will think its a Ion or somthing then they get shot... they will know its no Ion then

                    out of all the mods on AO, yours is truly my fav, Im not much for the polished up $2000 E-Mag or Ego, you have a truly unique gun, made by you.. thats why I like it, its the best sleeper.. and IMO best EP mag period. I've seen alot too. Id probly do one other thing, get a black tennis racket wrap and go around the front grip (totaly hide everything). you deserve the award winning dancing bananna!!

                    Originally posted by Hilltop Customs
                    finding the part of the foregrip to drill is the hardest part....

                    for the center hole you just have to measure until you have the center point(they make a tool for finding the center of a ciricle, but i didnt use it and cant think of the name) Just measure across the diameter a few few times....you should find the center after measureing 2 times, but verify by measuring a couple more.

                    The 2 that go in the sides are harder, and it is best to have a drill press and a small drill press vice for this. Attach the foregrip to the rail and clamp it in place so the rail is level. Now to center the bit on that high point take your drill press and slowly lower the bit down it down as you move the vice around...when the barely touches the foregrip is going to be the highpoint, and where you want to drill.

                    For the hole that goes between the grip frame and foregrip, once again mount the foregrip to the rail this time backwards so you will be drilling the hole at the front of the rail, and then rotating the foregrip around. Now clamp the foregrip itself into the jaws and make sure the rail is hanging vertical(both the side and top of rail is vertical) This assures you that once again the highpoint is where you want to drill.....follow the same method of moving the vice and lowering the bit...

                    If your going to drill with just a drill and not a press, it wont be straight.....unless you have some magic or are extremely lucky. thats not to say it wont work, it just will be nearly impossible to get it straight

                    Also do not forget while drilling out your foregrip that the original screw holes in the top(where it mounts to the rail) are pretty deep, and if you accidently pass through one, you will have to seal those screws in with some teflon tape. Try to avoid it if you can.


                    This was easily the hardest part of the entire project.....I wouldnt reccomend doing it without a press and vice.....

                    Comment

                    • MagModderMatt
                      Engineer & Paintballer
                      • Apr 2008
                      • 59

                      #55
                      now that I think about it..

                      My spyder grip (painted all black) with minnimal milling could fit a LPR inside without much trouble, just go out the other side I have banjo bolt so just let the air go all the way through my Rail, just tuck the hose down through the spyders arched top may need a bit of milling but would work, and be almost invisable 
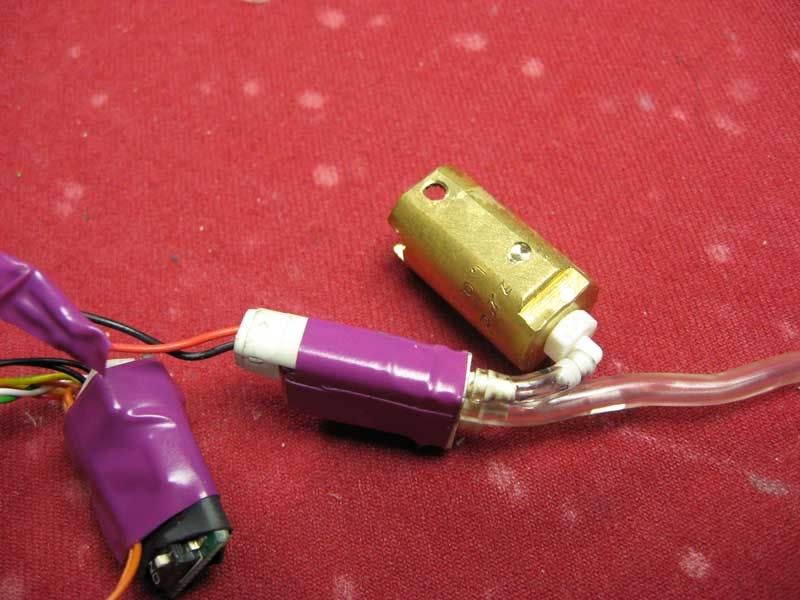
(spyder grips are shaped like a U on top, perfect for what I need I dont need to mill it flat either, I bought a front screw thats long enough. god I love my rail now (I hated it before) but the air going through the rail to the bolt and out the other side will work to my advantage, just take my guage off and I have air output for grip and lpr inside! think about it, its perfect!
                      & rail that puts air t up to the valve with the banjo bolt, If you dont know what I mean by the shape of the top of the spyder grip & rail I can post pics to show you. it's perfect! I dont need to do any tapping!!

                      Tiny cocker lpr or somthin should fit in my fat grip no prob. would look like a regular benchmark grip on the outside (just wider like E-mag grip)
                      you gave me a great idea!! thanks
                      ur sleeper is still is hella sick, Mine will just be lil different, by leavin the front grip alone. Banjo bolt is worth a damn! go figure

                      Matt
                      Last edited by MagModderMatt; 06-10-2008, 12:05 AM. Reason: fix typo

                      Comment

                      • Hilltop Customs
                        Registered User
                        • Aug 2007
                        • 1260

                        #56
                        good to see your getting it all thought out. Ive always loved the banjo bolt idea because I like to sight down the right side of my mag and theres that stupid macro fitting there. IMO there isnt a gun out there that looks as good as an old school RT....but then again I even have the old AGD poster of a guy painting the side of a house with a pic of an RT....they just look so clean.

                        Good idea on the cocker barrel adapter....it will make eyes much easier and you wont have to cut up every twistlock barrel you have. That body mod is nice too....ive been considering getting it for my old mag I have, but its just my exterme beater/loaner, so I cant justify it.

                        Comment

                        • cioeboy
                          pb for life!
                          • Jun 2005
                          • 75

                          #57
                          Originally posted by Hilltop Customs
                          Sorry to resurrect an old thread, but I just have to ask this. Where did you get that plastic 90* barb? I see them on pneumags alot and now that I'm starting an ep mag I dont want to have to clearance another big high flow 90 from palmers.

                          Comment

                          • BREAD_DA_PAINTER
                            GO DAWGS... Im a G8R-H8R

                            • Mar 2006
                            • 1034

                            #58
                            Originally posted by cioeboy
                            Sorry to resurrect an old thread, but I just have to ask this. Where did you get that plastic 90* barb? I see them on pneumags alot and now that I'm starting an ep mag I dont want to have to clearance another big high flow 90 from palmers.

                            look in the dealers thread for cyberave68 pnuemag and magnet thread and he sells the barbs your looking for.

                            Comment

                            • Hilltop Customs
                              Registered User
                              • Aug 2007
                              • 1260

                              #59
                              thanks BREAD_DA_PAINTER....that is exactly where I got them.

                              Comment

                              • cioeboy
                                pb for life!
                                • Jun 2005
                                • 75

                                #60
                                Thanks

                                In two weeks when I get my paycheck I should be able to complete my ego framed ep mag.

                                Comment

                                Working...