First strike capable automag

Collapse
X
 
  • Time
  • Show
Clear All
new posts
  • need4reebs
    OutKasT 4 Sho!!!

    • Feb 2011
    • 1441

    #46
    Originally posted by knownothingmags View Post
    I have that mount already made.
    im working on a larger automated drum
    just have to work positioning out. 12 rnds so far.
    any pics man?
    http://i257.photobucket.com/albums/h...8715822556.gif

    Comment

    • GoatBoy
      Junior Mint
      • Jun 2003
      • 1399

      #47
      Yeah, I’ve seen the flexible filament. Now if only I actually *had* a 3d printer…

      So you guys seriously cutting into ULE bodies to make them FS compatible?

      I strongly recommend against it as there is potential for ruin on many levels. But if you've got the cheddar, good luck!

      As far as pump mags -- if fields continue with the fruity rules that allow pump guns to chrono higher than semis... just imagine a compact pump FS Automag chrono'd at 300fps in the hands of a bona fide front player (against a field of semis chrono'd at 280 with normal paint). That is *not* going to be pretty. I predict it will be bad enough for them to revisit those rules.
      "Accuracy by aiming."


      Definitely not on the A-Team.

      Comment

      • knownothingmags
        RKM 3D Designs

        • Apr 2010
        • 4810

        #48
        Originally posted by need4reebs View Post
        any pics man?
        rotorwheel.pdf

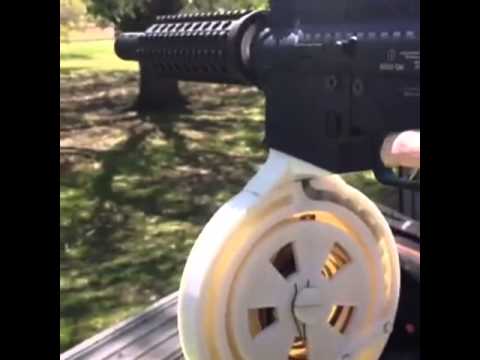
        sorry very basic wheel still getting bugs worked.
        my EFIN 3D printer isn't here yet.

        *Edit: the adapter was cannibalized and is being added to for the clip rotor im trying to make.
        so I was wrong I don't have the warp body adapter yet for something like this.
        but once I get into it ill mock one up.
        Last edited by knownothingmags; 10-07-2013, 08:14 PM.
        logoRKM 3D Designs

        Comment

        • need4reebs
          OutKasT 4 Sho!!!

          • Feb 2011
          • 1441

          #49
          huh?
          http://i257.photobucket.com/albums/h...8715822556.gif

          Comment

          • Grelvire
            • Feb 2005
            • 302

            #50
            Originally posted by knownothingmags View Post
            have you seen any possibility of a bigger drum? more like a tommy gun size?

            ill see if I can get our printer up and up again.
            Tommy gun size one would be awesome...................... good job GoatBoy

            Comment

            • AGDRetro
              AGD Enthusiast
              • Feb 2006
              • 764

              #51
              Originally posted by El Zilcho View Post
              What is even more impressive is that given the state of your entertainment center, you developed this back in the mid to late 90s
              Kind of disappointed by the lack of a Sega Saturn...
              Steve Shuey , Team Crimson Reign
              sigpic

              Comment

              • GoatBoy
                Junior Mint
                • Jun 2003
                • 1399

                #52
                I've got a Sega Genesis...

                I was making some tweaks to the model tonight and rendered up 6, 8, 10, and 12 chamber versions. Past 14 I seem to have a bug in my code which gives the compiler grief.

                mockups.png

                8 rounds looks manageable. At 10 and up, the single diverter geometry looks broken. The space the round needs to traverse appears too large. It can probably be fixed with multiple diverters.

                Personally, I'm going to stick with 6-8 rounders. Larger than that and you're paying a penalty for all that dead space in the middle as well as more "dead zone". And the torsion spring probably needs to change. All that extra space in the middle does give me another idea though...

                An alternate design if you like huge drum mags is something like this (not mine):


                It's not really a rotary loader; it's more like a curved conventional magazine. Still all the same faults as a typical magazine -- everything has to be pushed from the back by a single pusher, and you can't top up the drum while it's in use. But something like that might be up your alley. Massive "dead zone". And... probably going to be pretty expensive to 3d print, unless you own your printer.
                Last edited by GoatBoy; 10-09-2013, 01:30 AM.
                "Accuracy by aiming."


                Definitely not on the A-Team.

                Comment

                • need4reebs
                  OutKasT 4 Sho!!!

                  • Feb 2011
                  • 1441

                  #53
                  that 6 rounder that you already made and use in your videos would be my choice. keeps everything compact and simple. no need for bigger drum/mag really. great job man!!!
                  http://i257.photobucket.com/albums/h...8715822556.gif

                  Comment

                  • knownothingmags
                    RKM 3D Designs

                    • Apr 2010
                    • 4810

                    #54
                    yeah I have my own printer, we will see what I can get made.
                    logoRKM 3D Designs

                    Comment

                    • knownothingmags
                      RKM 3D Designs

                      • Apr 2010
                      • 4810

                      #55
                      Originally posted by GoatBoy View Post
                      I've got a Sega Genesis...

                      I was making some tweaks to the model tonight and rendered up 6, 8, 10, and 12 chamber versions. Past 14 I seem to have a bug in my code which gives the compiler grief.

                      [ATTACH=CONFIG]88459[/ATTACH]

                      8 rounds looks manageable. At 10 and up, the single diverter geometry looks broken. The space the round needs to traverse appears too large. It can probably be fixed with multiple diverters.

                      Personally, I'm going to stick with 6-8 rounders. Larger than that and you're paying a penalty for all that dead space in the middle as well as more "dead zone". And the torsion spring probably needs to change. All that extra space in the middle does give me another idea though...

                      An alternate design if you like huge drum mags is something like this (not mine):


                      It's not really a rotary loader; it's more like a curved conventional magazine. Still all the same faults as a typical magazine -- everything has to be pushed from the back by a single pusher, and you can't top up the drum while it's in use. But something like that might be up your alley. Massive "dead zone". And... probably going to be pretty expensive to 3d print, unless you own your printer.
                      I like your design, simple,
                      I can print up to about 8 inches, figure the pinwheel needs to be less since there will be a casing around it.

                      if you need stuff printed, or if the one you use isn't readily available, ill try to see what I can do.

                      soon to come printed automag

                      thankyou,
                      KNM.
                      logoRKM 3D Designs

                      Comment

                      • GoatBoy
                        Junior Mint
                        • Jun 2003
                        • 1399

                        #56
                        My impression is that owning a 3d printer is not quite what it's cracked up to be at this time. Good luck with yours; hopefully you won't need to do too much calibration.

                        I got my nylon based impellers from Shapeways, and I have to say they knocked them out of the park on this one. (Can't say the same about the rail that I got back from them as well.)


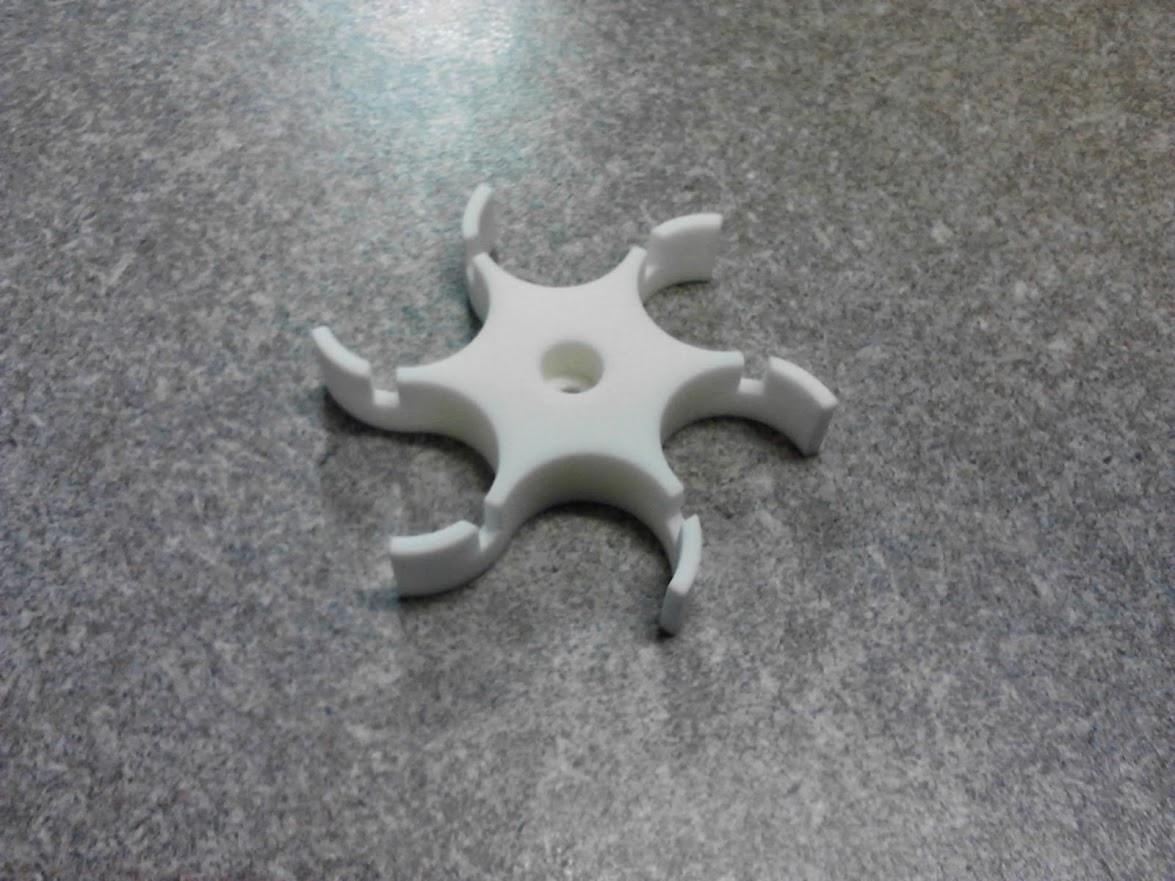
                        I shortened the diverter to give the impeller more meat, and now it seems pretty strong. It's not metal-strong, but I think this should be strong enough. It's slightly more flexible than the photopolymer, which tends to crack and shatter instead of flexing.

                        I also put the original rear plate back on. It came from Shapeways deformed, but after a while it kind of just... settled down. So now it's flat enough to actually use. The previous one I was using was actually a privacy filter for a computer monitor, but whatever they did to that plastic gave it a high coefficient of friction so I decided to ditch it.

                        Here I am testing with dummy rounds. Note how little force is required to feed the rounds; I'm giving it just a partial wind with my thumb. If everything is designed and made properly, it takes very, very little force to reliably and quickly feed FS rounds.

                        "Accuracy by aiming."


                        Definitely not on the A-Team.

                        Comment

                        • knownothingmags
                          RKM 3D Designs

                          • Apr 2010
                          • 4810

                          #57
                          Originally posted by GoatBoy View Post
                          My impression is that owning a 3d printer is not quite what it's cracked up to be at this time. Good luck with yours; hopefully you won't need to do too much calibration.

                          I got my nylon based impellers from Shapeways, and I have to say they knocked them out of the park on this one. (Can't say the same about the rail that I got back from them as well.)


                          I didn't know you were having people do your stuff for you, yeah they have a nice powder 3D printer, they are tits,
                          ill have one of those soon,
                          calibrations is nothing on mine,
                          and a quick acetone vaporizing on them and they are smooth as glass.
                          im working on gears right now, nothing for a purpose, makin a gear heart for the wife, in my thread you can see the dye damn prototype stock mount im workin on, needs some tweekin, then ima make 5 of them and put them through there paces and see how much it takes to break em. final test will be with a hammer.
                          logoRKM 3D Designs

                          Comment

                          • cousinkong
                            Registered User
                            • Jan 2008
                            • 12

                            #58
                            Sweet build, good thinking. Have you thought of having a fixed rear plate that has 6 holes drilled in where the rounds sit at rest. The holes could be slightly smaller diameter than the FS rounds so once they are pushed in they would not back out. Then you could see how many rounds were in the drum without counting and you wouldn't have to move the rear plate to reload. Just a thought, it may cause rounds to get stuck and not spin around the drum freely if the rear plate doesn't move.

                            Comment

                            • GoatBoy
                              Junior Mint
                              • Jun 2003
                              • 1399

                              #59
                              Originally posted by cousinkong View Post
                              Sweet build, good thinking. Have you thought of having a fixed rear plate that has 6 holes drilled in where the rounds sit at rest. The holes could be slightly smaller diameter than the FS rounds so once they are pushed in they would not back out. Then you could see how many rounds were in the drum without counting and you wouldn't have to move the rear plate to reload. Just a thought, it may cause rounds to get stuck and not spin around the drum freely if the rear plate doesn't move.
                              That was actually what I tried to do at first. I wanted to make it completely open in the back with maybe some form of detent holding them in once pressed in, but I never could quite figure out how to really make it work properly with the skirt. The real benefit actually being that the "back plate" winds up being one piece with the impeller and thus the whole thing is way stronger despite the diverter cuts. That, and I could then build a speed-loader.

                              Having 6 gaping holes in the back is also not so good for keeping dirt out of the system as well, and I do my fair share of crawling around with this thing.

                              Truthfully, I wanted a clear acrylic back plate to make it easier to see the empty chambers.

                              Not sure what you mean by rounds getting stuck or whatever; the rear plate is only touching the impeller and drive shaft. It is minimally touching the outer housing. So basically, when the impeller moves, the back plate moves as there's nothing else to resist the movement. However it still spins easily when I push it directly because the friction between it and the impeller should still be low. So if I leave the gate straddling two chambers, that gate remains straddling two chambers, and no round ever escapes.

                              Only cases of jams so far are when I forget to wind the thing in between games, or when I take that 6th safety shot.
                              "Accuracy by aiming."


                              Definitely not on the A-Team.

                              Comment

                              • debruynda
                                Carlos Danger
                                • Feb 2013
                                • 302

                                #60
                                Very cool!

                                Out of curiosity, what kind of valve setup is that? It looks like a vigilante reg on the back half? Apologies if you already addressed it, I just got done working and only watched the video and it caught my eye.

                                Comment

                                Working...